Reviewing the Basics
Reviewing the Basics
While learning a new programming language, students review the major concepts and material from Bootstrap:Algebra, including Contracts, Expressions dealing with numbers, strings and images, Variable definitions, Function definitions, and the Design Recipe.
Prerequisites |
None |
Product Outcomes |
Students define functions based on a problem statement. |
Materials |
|
- contract
-
a statement of the name, domain, and range of a function
- design recipe
-
a sequence of steps that helps people document, test, and write functions
- domain
-
the type or set of inputs that a function expects
- library
-
a collection of functions that can be made available to our program by using include
- name
-
how we refer to a function or value defined in a language (examples: +, *, star, circle)
- programming language
-
a set of rules for writing code that a computer can evaluate
- purpose statement
-
a brief description of what a function does
- range
-
the type or set of outputs that a function produces
- syntax
-
the set of rules that defines a language, whether it be spoken, written, or programmed.
- variable
-
a letter, symbol, or term that stands in for a value or expression
Introduction to Pyret 30 minutes
Overview
As an advanced Bootstrap module, Reactive pretty much requires that students be comfortable and confident with defining values, applying functions, using the Design Recipe, and reading contracts. This lesson is all about review.
Launch
Welcome back to Bootstrap! In Bootstrap:Algebra, you used a programming language called Racket to make your video games. We chose this language because it behaves like algebra, but there are many different languages you could use to make video games. In Bootstrap:Reactive, you’re going to learn a new language, called Pyret. Pyret has many of the features of Racket, but with a different syntax that looks more like popular languages such as Python. This unit will help you make the switch to Pyret syntax in no time!
Open your workbook to Unit 1 (Page 2). Here we have a table, with examples of value definitions in Racket and Pyret. On the left-hand column, we’ve defined values in Racket, and on the right we have the same values defined in Pyret. For instance, the first line on the left-hand side says (define AGE 14). Directly to the right, we have the Pyret syntax: AGE = 14, which does the same thing: defines a variable called AGE, which has a value of 14.
Investigate
Take a look at the other values defined here for Numbers, Strings, Images, and Booleans. On the right-hand side of the table, practice defining values in Pyret:
-
two additional Numbers
-
two additional Strings
-
one more Boolean
-
one more Image
The last row of the table on Page 3 shows you the same function definition in Racket and Pyret. We’ll go into more detail on functions soon.
Open the Review file in a new window. The first thing you’ll notice is that we’re no longer using WeScheme to edit our programs, although the Pyret editor behaves very similarly. The definitions area (where you write code you want to save for later) is on the left side of the screen, and the interactions area (where you write code you just want to test out once, like scratch paper) is on the right. The top of the editor has space to write a name for your program, and the "Run" button at the top right will clear the interactions area and run whatever program is written in the definitions area.
The first line of code here will be new to you: Since Pyret has a lot more functions than you’ve seen in other Bootstrap class, to keep things simple we’ve grouped some of these functions into libraries. The line include image tells Pyret to load all of the functions from the image library for use in this file, so we can use familiar functions like star, triangle, rectangle, scale, rotate, and more.
-
What are the names of the variables defined in this file? What are their values?
-
What would you get back if you were to evaluate each of those variables in the Interactions area? Take a guess first, then click "Run" and type the name of each variable into the interactions area. Were your guesses correct?
Look at the variable OUTLINE on line 16.
-
What shape will this draw?
-
How big do you think it will be?
-
Will it be solid or outline?
-
What color will it be?
Try evaluating OUTLINE in the interactions area. Was the fill what you expected it to be?
The problem is that we used a very confusing variable name: the name was “OUTLINE”, but the value was a solid green star. Remember: always choose your variable names carefully!
Replace this variable name with something more descriptive.
Remind students about the importance of good variable names: they make code more readable, and a descriptive variable name makes it very clear what is being defined.
As you can see, Pyret uses the same data types that we used in Racket: Numbers, Strings, Images, and Booleans are used in Pyret, and look and behave in the same way.
In your review file, define the new Numbers, Strings, Images, and Boolean you wrote in your workbook on pages/review-1.html.
Now we have values, and we know how to define shortcuts for them. There are also plenty of built-in functions, which let us play around with these values.
What are some functions you know that work on numbers? How many can you list?
The spaces matter because Pyret allow various non-alphabetic characters to be used in names of variables and identifiers. Pyret needs the spaces to tell whether - is a minus sign or a hyphen, for example. The spacing rule thus applies to all arithmetic function characters.
Synthesize
How is this similar to what you’ve seen before? How is it different?
Contracts 10 minutes
Launch
It’s important to keep track of how functions work, and Bootstrap:Algebra introduced the idea of Contracts. The contract for the star function is shown below.
# star :: Number, String, String -> Image
Contracts summarize three pieces of essential information about a function:
-
The Name of the function: in this case,
star. -
The Domain of a function, which is the type(s) of data that the function expects. In this case, a Number and two Strings.
-
The Range of this function, which is the type of data that the function produces: In this case, an Image!
Every contract has three parts: Name, Domain and Range!
A contract is a note we write to ourselves about how to use the function. Just as in Bootstrap:Algebra, it will be helpful to keep track of the contracts for each function you learn about. The last page in your workbook has a table labeled “Contracts”, where you can (and should!) copy down each contract as you learn it. Contracts in Pyret are just as important as they are in Racket, and are written the same way. You write contracts as comments: pieces of text for humans only, which are ignored by the computer. In Racket we used a ; (semicolon) before Contracts, but in Pyret, just put a # (pound sign, or octothorpe) before a line of text to turn it into a comment!
Investigate
The Contract for + is shown below.
# + :: Number, Number -> Number
Write down the Contracts for *, -, / and num-sqrt in your
Contracts page. (You know num-sqrt as the sqrt function in
Racket!)
Emphasize to students that a function’s contract can tell you a LOT about that function. It may also be useful to ask them to articulate reasons why Contracts are a good thing, so they are able to say it in their own voice. Make sure they write every contract down in their workbooks!
Below are some Pyret expressions using functions you used in Bootstrap:Algebra. For each one, identify which function is being used and write its Contract in your Contracts page. If you need help, try typing the expressions into your computer.
-
circle(75, "solid", "red") -
rectangle(20, 30, "outline", "green") -
ellipse(85, 100, "solid", "pink") -
text("Hello world!", 50, "blue")
For even more practice, have students write contracts for various word problems. This is a great time to remind them about connections to algebra and applying skills learned in Bootstrap to their math classes.
The Design Recipe 25 minutes
Launch
Now you know how to define values in Pyret, and you know how to use Contracts for pre-built functions. But what about defining functions of your own? In Bootstrap:Algebra, you used a tool called the Design Recipe to define functions from word problems. Let’s review the steps of the Design Recipe in Pyret.
Turn to Fast Functions! (Page 4) in your workbook.
Here we have a function definition:
# double :: Number -> Number
examples:
    double(5) is 2 * 5
    double(7) is 2 * 7
end

fun double(n):
    2 * n
end
Step 1: Write the Contract and Purpose Statement
-
What is the Name of this function? How do you know?
-
How many inputs does it have in its Domain?
-
What type of data is the Domain?
-
What is the Range of this function?
-
What do you think this function does? What would be a good Purpose Statement for this function?
The Contract is a way of thinking about the function in a general way, without having to worry about exactly how it will work or how it will be used. By starting with simple questions such as these, later steps will be much easier to think about.
Review the importance of definitions for students (Defining values helps cut down on redundancy and makes future changes easier, defining functions also allows for simplicity and testability.) Be sure to use vocabulary - Contract, Domain, Range, Example, etc. - regularly and carefully, pushing students to use the proper terms throughout. The Design Recipe is a useful tool for having students think about word problems and break them down into smaller parts (Contract, purpose statement, examples, and code). Instead of jumping into writing a function, students should first note what data types the function will take in and produce, and practice using their own words to describe what the function does. After this step, the Contract and Purpose Statement can be relied on to write examples for the function.
Step 2: Give Examples
In Bootstrap:Algebra you wrote EXAMPLES for every function, to show how the function could be used with some inputs. Those examples also worked to test your function, and would give you error messages if the expected result didn’t match the result produced by the function body. Pyret has the same thing, but written differently. Here are our examples for the function double:
examples:
      double(5) is 2 * 5
      double(7) is 2 * 7
end
The key words here are examples and is. Pyret knows that anything within the examples: and end lines are your examples, and just like in Racket, we start with the name of the function and some input(s), followed by the code we expect to get back. This time, we have the word is between them, to say: …test… is equivalent to …result… Once you’ve defined the function itself, Pyret will automatically check your examples to make sure your results match the function body. If they don’t, you’ll get an error message, just like in Bootstrap:Algebra.
Make sure students are writing Pyret code for the results of their examples. double(5) is 10, while technically correct, doesn’t show us the work and thought process behind the code, and makes it much harder to define the function in the next step. Writing examples is akin to "showing your work" in math class: You want to see how students arrived at their answers, not just that they have an answer. It is also much easier to debug a function using the design recipe, because you can check each section individually for errors. Writing examples for code is also called "unit testing," something professional programmers do all the time.
Investigate
At the bottom of pages/fast-funs-double.html in your workbook, write the contract and two examples for a function called triple, which takes in a number as its input and multiplies it by 3.
Now look at your two examples. What is the only thing that changes from one to the other?
In your workbook, circle what is changeable, or variable, between your two examples.
The only thing that changes is the Number being given to triple and multiplied by 3. Remember from Bootstrap:Algebra that once you’ve circled and labeled what changes in each example, it becomes incredibly easy to define the function! All you need to do is replace the thing that changes with its label!
Step 3: Define the function
fun double(n):
    2 * n
end
Like writing examples, defining the function is just a bit different in Pyret. To start, we write the word fun instead of define. Then it’s just like you remember from Bootstrap:Algebra. Copy everything from your examples that doesn’t change (except for the word is!), and replace the changeable thing with the variable you picked. Don’t forget a colon ( : ) after your function header, and the word end at the end of the function body, to let the computer know you’re finished defining that function!
Now write the function header and body for triple. Don’t forget to replace the changing thing with a variable!
Just as writing a Contract helps us write examples, writing examples makes it easier to write the function definition: circling what changes between the examples makes it obvious that the changeable thing is where we need to use a variable in our function. You will want to explicitly connect each step in the Design Recipe to every other step. Ask students to justify each part of their Contract by referring back to the Word Problem, to justify each step of their examples by referring back to their Contract, and to justify each step of the definition by referring to their Contract and Examples. The same variable name can be used in multiple functions, just as in math (where many functions use x as the variable name, for example). This activity can be done as a team competition: teams have one minute to write the contract and two examples for triple, and another minute for the function header and body. Assign points to the teams that complete each function. Make sure students fill out the ENTIRE contract, with two examples, before they circle what changes and move on to the function body. Build these good habits early in the course!
Investigate
Try using the Design Recipe to solve the following word problems (in the “Fast Function” areas starting on Fast Functions! (Page 5) of your workbook):
-
Write a function
plus1, that takes in a number and adds one to it -
Write a function
mystery, that takes in a number and subtracts 4 -
Write a function
red-spot, that takes in a number and draws a solid red circle, using the number as the radius
Have a student act out one of the functions they’ve defined. They will take on the name and behavior of that function (plus1, red-spot, etc.) and can be used by the class. Remind the class that in order to use the function they must practice calling it by name with some input(s).
For some extra practice with Pyret syntax, turn to pages/bug-hunting.html in your workbook and see if you can spot the bugs in the Pyret code in the left column. Circle each error (some sections might have more than one!), and then write the correct code in the right column.
Students will make syntax errors when learning any new language. This workbook page is intended to give them practice finding syntax bugs on paper first, to help identify the same bugs while typing later on.
Images in Pyret 20 minutes
Overview
Launch
You’ll be working with a lot of animations in Bootstrap:Reactive. In Bootstrap:Algebra, the way your game characters moved and where they were placed on the screen was mostly determined for you. In this course, you have all the control over your animation. To start, let’s practice making static scenes: images with no animation. Do you remember the put-image function from Racket? Pyret has the same function, and its contract should look familiar:
# put-image : Image, Number, Number, Image -> Image
-
Open the Take a hike! starter file.
-
At the beginning of the file, we’ve provided you with a few image values. What are their names?
-
Try typing
HIKER1into the interactions area. What do you see? -
Look below the line that says
# Creating a scene. What is the name of the value defined here? -
What data type is
SCENE? How do you know?
This piece of code uses the put-image function to place the image of the boat onto the BACKGROUND at the coordinates 750, 200. To find out the best place to put the image of the boat, first we had to find out how large the background image was. Two functions help with this:
# image-width :: Image -> Number
which returns the width of the given image (in pixels), and
# image-height :: Image -> Number
which returns the height of the given image.
Try evaluating image-width(BACKGROUND) in the interactions area to find the total width of the background.
Since the range of put-image is an image, the expression put-image(BOAT, 750, 200, BACKGROUND) will evaluate to an image. If we then want to put the image of a hiker onto this image (like creating a collage), we can do that by nesting expressions using the put-image function.
put-image(HIKER1, 700, 500,
          put-image(BOAT, 750, 200, BACKGROUND))
Investigate
Now it’s time to create your own scene. To start,
-
Place both hikers onto the mountains.
-
Get some perspective: scale the image of the hiker higher on the mountain, so they appear smaller than the other hiker.
-
Find your own images to add to the scene using the
image-urlfunction. (This works just like thebitmap/urlfunction from Bootstrap:Algebra.
# image-url :: String -> Image
Hint: Recall the image manipulation functions you used in Bootstrap:Algebra. These may come in handy!
-
# scale :: Number, Image -> Image -
# rotate :: Number, Image -> Image
In the upcoming lessons, students will be creating their own scenes from scratch, and then animating them. This activity is meant to familiarize students with the put-image function, and have them practice placing, moving, and scaling images onto a background. Once students have copied the necessary contracts into their workbook, this activity could be assigned for homework, or completed as an in-class activity.
Closing 5 minutes
You just reviewed the first half of the entire Bootstrap:Algebra course in one unit, and learned how to write material from Bootstrap:Algebra in the syntax of a new language! Throughout Bootstrap:Reactive you’ll use all the concepts that you learned in Bootstrap:Algebra, as well as brand new data types, functions, and programming concepts. Of course, you’ll do it all with the help of our old friend the Design Recipe, which will help you write your own functions for your own video game! Since this is Bootstrap:Reactive, the games you will be able to create will be even more interactive and advanced than in Bootstrap:Algebra. There’s a lot to learn… onward to Unit 2!
If time permits, have students practice solving other algebra word problems using the Fast Functions sections on pages/fast-funs.html in their workbook.
These materials were developed partly through support of the National Science Foundation,
(awards 1042210, 1535276, 1648684, and 1738598).  Bootstrap:Reactive by Emma Youndtsmith, Emmanuel Schanzer, Kathi Fisler, Shriram Krishnamurthi, Joe Politz and Dorai Sitaram
is licensed under a
Creative Commons 4.0 Unported License.
Based on a work at www.BootstrapWorld.org.
Permissions beyond the scope of this license may be available by contacting
schanzer@BootstrapWorld.org.
Bootstrap:Reactive by Emma Youndtsmith, Emmanuel Schanzer, Kathi Fisler, Shriram Krishnamurthi, Joe Politz and Dorai Sitaram
is licensed under a
Creative Commons 4.0 Unported License.
Based on a work at www.BootstrapWorld.org.
Permissions beyond the scope of this license may be available by contacting
schanzer@BootstrapWorld.org.
Introduction to Data Structures
Introduction to Data Structures
Students discover the need for compound data — data structures — using 2-dimensional animation. They learn the syntax for data blocks, constructors and dot-accessors, and practice each by creating a “digital bakery”.
Prerequisites |
None |
|||||||||||||||
Product Outcomes |
|
|||||||||||||||
Materials |
|
|||||||||||||||
Language Table |
|
|||||||||||||||
Preparation |
|
- calling
-
using a function by giving it inputs
- constructor
-
a function that creates instances of a data structure
- contract
-
a statement of the name, domain, and range of a function
- data structure
-
a datatype which packages several datatypes as fields
- domain
-
the type or set of inputs that a function expects
- dot-accessors
-
a way to extract the values of fields an instance
- field
-
a part of a data structure that has a name and holds a single value of a specified datatype
- instance
-
a specific, packaged value of a data structure that contains other values in its fields
- name
-
how we refer to a function or value defined in a language (examples: +, *, star, circle)
- purpose statement
-
a brief description of what a function does
- range
-
the type or set of outputs that a function produces
- variable
-
a letter, symbol, or term that stands in for a value or expression
Review 15 minutes
Launch
In the previous unit, you reviewed almost everything from Bootstrap:Algebra including Datatypes, Contracts, and the Design Recipe. In this unit you will go above and beyond all that, and learn an entirely new construct that will be the basis for everything you’ll do in Bootstrap:Reactive.
Ask a few introductory review questions to test students’ understanding:
-
What are the three parts of a Contract?
-
What is the Pyret code to draw a solid, green triangle of size 22?
-
Why is it important to write at least 2 examples before defining a function?
Investigate
To make sure the material from the previous unit is fresh in your mind, tackle the following activity:
Turn to Word Problem: double-radius (Page 9) in your workbook. Write a function called double-radius, which takes in a radius and a color. It produces an outlined circle of whatever color was passed in, with radius twice as big as the input.
If walking through this example as a class, use a projector so kids can see the function being written on the computer.
Remember how to use the design recipe to work through word problems?
Step 1: Contract and Purpose Statement
-
What is the Name of this function? How do you know?
-
How many inputs does it have in its Domain?
-
What kind of data is the Domain?
-
What is the Range of this function?
-
What does this function do? Write a Purpose Statement describing what the function does in plain English.
# double-radius :: Number, String -> Image
# Makes an outlined circle that has twice the given radius.
Review the purpose of Contracts: once we know the Name, Domain, and Range of a function, it’s easy to write examples using those datatypes.
Step 2: Examples
Using only the Contract and Purpose Statement, see if you can answer the following questions:
-
Every example begins with the name of the function. Where could you find the name of the function?
-
Every example has to include sample inputs. Where could you find out how many inputs this function needs, and what type(s) they are?
-
Every example has to include an expression for what the function should do when given an input. Where could you look to find out what this function does?
-
Write two examples on your paper, then circle and label what is changing between them. When labeling, think about what the changing things represent.
Don’t forget to include the lines examples: and end! Your examples should look similar to:
examples:
  double-radius(50, "pink") is
        circle(50 * 2, "outline", "pink")
  double-radius(918, "orange") is
        circle(918 * 2, "outline", "orange")
end
Each one of these answers can be found in the Contract or Purpose Statement. Suggestion: Write these steps on the board, and draw arrows between them to highlight the process. The goal here is to get students into the habit of asking themselves these questions each time they write examples, and then using their own work from the previous step to find the answers.
Step 3: Definition
Once you know what is changing between our two examples, you can define the function easily. The things that were circled and labeled in the examples will be replaced with variables in the function definition.
Underneath your examples, copy everything that doesn’t change, and replace the changing things with the variable names you used. (Don’t forget to add the fun and end keywords, as well as the single colon (:) after the function header!)
# double-radius :: Number, String -> Image
# Makes an outlined circle that's twice the radius.
fun double-radius(radius, color):
  circle(radius * 2, "outline", color)
end
For more practice, turn to Word Problem: double-width (Page 10) in your workbook and complete the Design Recipe for the double-width function.
Check students understanding: Why do we use variables in place of specific values? Why is it important to have descriptive variable names, as opposed to n or x? Remind students about nested functions: A function whose range is a number can be used inside of a function requiring a number in its domain, as in circle(2 * 25, "outline", "red").
Introducing Structures 30 minutes
Open the Package Delivery file on your computer and press ‘Run’. What happens?
The drone tries to deliver a package directly to a house, but the box falls straight down, outside of the delivery zone. We want the package to fall diagonally, and land right in front of the house. Let’s take a look at the code to see why it falls into the road instead. There are a few new concepts in this file, but first, let’s focus on what you already know.
Look at the function defined here called next-position.
-
What is this function’s Domain? Its Range?
-
What does
next-positiondo with its inputs?
This function takes in two numbers, representing the x- and y-coordinate of the box, but it only produces a new y-coordinate (after subtracting 5). If only the y-coordinate is changing, the box will always fall straight down. To reach the house, it will have to fall diagonally.
How should the box’s x-coordinate change if it moves diagonally to the right (toward the house)? How should its y-coordinate change?
Functions can return only one thing at a time, but we want to return a new x- and a y-coordinate in order to make the box fall diagonally. Thankfully, we have a way to combine multiple things within one container, called a Data Structure. For this project, we’ve created a structure for you to use called DeliveryState, which contains two Numbers. These represent an x and a y-coordinate.
Look at line 5, where we’ve defined DeliveryState. We’ll go through the new syntax for defining a data structure, because very soon you’ll be defining brand new structures of your own!
# The DeliveryState is two numbers: an x-coordinate and a y-coordinate
data DeliveryState:
   | delivery(
      x :: Number,
      y :: Number)
end
-
On the first line, we’ve written a comment that describes the stucture. We’re calling it
DeliveryState, and it contains Numbers for the x- and y-coordinate. -
You’re already familiar with built-in data types like
Number,String,ImageandBoolean. On the next line, thedatakeyword allows us to create brand new data types of our own! Here, we are making a data type calledDeliveryState. We choose this name, because it represents the current state — or position — of the package being delivered. Pyret lets us write any name afterdata, but it’s good habit to choose a meaningful name and capitalize it. -
The next line begins with the
|symbol, sometimes called a “bar” or “pipe”, followed by the name of the constructor function for this structure:delivery. This is similar to what you’ve seen before: to create an Image, we call the function that creates it:rectangle,triangle,square, etc. To create aDeliveryState, we can use thedeliveryconstructor function with its inputs (x and y).
This data block tells us that we’re defining a new data type called DeliveryState, whose constructor function delivery takes in two Numbers: x and y. Once we’ve listed each input and its data type, we finish defining the structure with the end keyword, just like finishing an example block.
In the interactions area, practice making some DeliveryStates using the delivery() constructor function. Try making a DeliveryState that represents the box’s position if it’s on the road, another when it’s in the air, above the house, and one when it’s right in front of the house — a successful delivery!
Students will soon be writing creating new data structures. Cover this new syntax carefully, paying special attention to capitalization (the name of the structure is capitalized (DeliveryState), whereas its constructor function (delivery) is lowercase), double colons (::) before data types, and commas between inputs to the constructor function.
Now it’s up to us to get this box delivered sucessfully, and make sure it lands at the house.
Turn to Word Problem: next-position (Page 11) in your workbook, read the word problem, and fill in the Contract and Purpose Statement for the function next-position.
# next-position :: Number, Number -> DeliveryState
# Given 2 numbers, make a DeliveryState by
# adding 5 to x and subtracting 5 from y
Point out that we’re now using a new data type in a contract: next-position consumes two Numbers, and produces a DeliveryState. Once we’ve defined a new data structure using the above data block, we can use it just like other datatypes.
Now for our two examples. Using, or calling next-position with two numbers is easy, but what happens to those numbers? We can’t return both at the same time…unless we use a data structure! To do so we’ll need to use the constructor function to make a structure from the data we already have.
-
According to the definition for
DeliveryState, what function makes a DeliveryState? What is its contract? -
# delivery :: Number, Number -> DeliveryState -
What two things are part of a DeliveryState? Do we have values for those things as part of our first example?
-
We don’t want our DeliveryState to contain the same x and y values we gave the
next-positionfunction. How will the values change? (Remember to show your work!) -
Your first example should look something like:
examples:
  next-position(30, 250) is delivery(30 + 5, 250 - 5)
end
-
Once your first example is complete, write one more example with different inputs for the x and y coordinates.
Remind students to show every step of their work in the example step of the design recipe: if the x-coordinate increases by 5 while the y-coordinate decreases by 5, they should show the addition and subtraction within the DeliveryState data structure, instead of just returning the new numbers.
Now that you have two examples, it’s time to define the function. You know the drill: circle and label everything that changes between your two examples, copy everything that stays the same, and replace the changing things with the variables you chose.
When you finish, your function definition should look like:
fun next-position(x, y):
  delivery(x + 5, y - 5)
end
Now, instead of just changing and returning one number (a y-coordinate), we can return both the x and y-coordinates of the box within a Data Structure.
Open the Package Delivery code again and replace the original next-position function with the one in your workbook to make the box land within the dlivery zone, in front of the house! Don’t forget to change the given examples to match your new function definition.
Synthesize
Until now, a function could only return atomic values: single Numbers, Strings, Images, or Booleans. In Bootstrap:Reactive, our functions will still return one value, but that value can be a Data Structure, (or just “structure” for short) containing any number of values. This way we can return both the x- and y-coordinate of a package using a DeliveryState. Later on, we’ll create new structures to record detail about characters in a game, like their health, position, amount of armor, or inventory.
In Bootstrap:Algebra, students’ games were made by keeping track of just a few numbers: the x-positions of the danger and target, and y-position of the player. In Bootstrap:Reactive, students’ games will be much more complex, and will require many more values to move characters, test conditions, keep track of the score, etc. Data structures simplify code by organizing multiple values: You couldn’t represent every part of a player (position, health, inventory, etc.) with one number or string, but you can refer to all these things collectively with a data structure. This way, we can have one value (a data structure) containing multiple other values that can be accessed individually.
Cakes 30 minutes
Overview
Students walk through the process of defining a data structure based on a word problem.
Launch
Suppose you own a famous bakery. You bake things like cookies, pastries, and tarts, but you’re especially known for your world-famous cakes. What type of thing is a cake? Is it a number? String? Image? Boolean? You couldn’t describe all of the important things about a cake with any one of those data types. However, we could say that we care about a couple of details about each cake, each of which can be described with the types we already know.
For each of the following aspects of a cake, think about what datatype you might use to represent it:
-
The flavor of the cake. That could be “Chocolate”, “Strawberry”, “Red Velvet”, or something else.
-
The number of layers
-
Whether or not the cake is an ice cream cake.
What datatype could we use to represent the entire cake?
Now that we know everything that is part of a cake, we can use a data structure to represent the cake itself. Let’s take a look at how this works.
Investigate

Open your workbook to Data Structure (Page 12).
On this page, we will define a data structure for cakes, which we call CakeType (since this is now a new data TYPE). At the top of this page we see a comment, stating what things are part of a CakeType. Below that is a line that says data CakeType:, which begins the definition of a new data structure, called CakeType. On the next line, we define the function that makes a CakeType (cake), and how exactly to make a CakeType — the names of each thing in a CakeType, and their data types. Each piece of information that makes up a cake (the flavor, etc) is called a field. A field has both a descriptive name (like flavor) and a datatype.
What name describes the first field in a CakeType? What data type can we use to represent it?
Refer students back to their language table, to see what Types are available.
- There is a little bit of new syntax involved in defining structures. On the first line on Data Structure (Page 12), we write `flavor
-
String,`, which tells Pyret that the first element of any CakeType will be its flavor, represented by a String. This line shows how to define one field in a data structure.
What name describes the second field in a CakeType? What data type can we use to represent it?
- On the next line, write `layers
-
Number,`, which tells Pyret that the second element of any CakeType will be its number of layers, represented by a Number.
What data structure should we use to represent whether or not the CakeType is an ice cream cake? Use this to define another field.
On your paper, you should have:
# a CakeType is a flavor, number of layers, and whether or not it is an ice cream cake.
data CakeType:
  | cake(
      flavor      :: String,
      layers      :: Number,
      is-iceCream :: Boolean)
end
This is the code that defines the CakeType data structure. It tells the computer what a CakeType is and what goes into it. It also defines its constructor function, called cake. To make a CakeType, you must call the constructor function with three things: a flavor, which is a String, layers, a Number, and is-iceCream, which is a Boolean. Remember that order matters! For now, these are the only things that we’re going to keep track of in a CakeType, but you can imagine how you might extend it to include other information.
Stress the importance of being able to define your own datatypes to students: no longer are they bound by the single values of numbers, strings, or booleans! Pyret allows you to define brand new Data Structures, containing any combination of values.
Open the Bakery file and look at lines 3–8. Do they match what you have on your paper?
Now take a look farther down, at line 10: birthday-cake = cake("Vanilla", 4, false)
-
What is the name of this variable?
-
What is the flavor of
birthday-cake? -
How many layers does
birthday-cakehave? -
Finally, is
birthday-cakean ice cream cake, or not?
Below the data definition for CakeType there are four CakeTypes defined and assigned to the variables birthday-cake, chocolate-cake, strawberry-cake, and red-velvet-cake. Ask students questions about these CakeTypes to get them thinking about how they would define their own.
On line 14, define another CakeType, which you can name however
you like (but choose something descriptive, like pb-cake,
lemon-cake, etc.) To start,
-
How would you define this variable?
-
What function is used to make a Cake?
-
Which thing comes first in a Cake structure?
Now what do you expect to happen when you type the name of your new CakeType into the interactions area? Click ‘Run’ and try it out.
pb-cake = cake("Peanut Butter", 2, true)
Have students walk you through the process of defining a new value and making a CakeType with whatever flavor, etc. they like.
Define two new values for some of your favorite cakes. You can give them whatever names you prefer. You can make any kind of `CakeType`s that you want, as long as your structure has the right types in the right orders!
 🖼Show image
Repetition is key in this lesson. Have students identify each part of the
🖼Show image
Repetition is key in this lesson. Have students identify each part of the CakeType for every one they’ve defined. What is the flavor of their first CakeType? Its number of layers? Ensure that students are using their inputs in the right order!
At this point, you’ve worked with two different Data Structures: JumperStates and CakeTypes, and you’ve created different examples, or instances, of these structures. Instances are concrete uses of a datatype, just as 3 is a concrete Number (where Number is the type). Here, CakeType is the type, and cake("Chocolate", 8, false) is a concrete cake with specific values for each field. In programming, we create instances much more often than we create new data structures. For now, the important point is to recognize the difference between a structure definition (the data…. piece of code) and specific instances of a data structure (like birthday-cake, or jumper(44, 75).
Common Misconceptions
Students often struggle with the difference between the definition of a data structure and instances (items created from) that data structure. When students define CakeType, they haven’t created any specific cakes. They have defined a type that they can use to define specific cakes. If they have a specific cake, they can ask questions of it such as "is this a chocolate cake?"and produce an answer. If all they have is the CakeType definition, they can’t answer such questions. Some people like the analogy of a cookie cutter here – CakeType defines a cookie cutter, but doesn’t produce any cookies. To get a cookie, you use the cake constructor to define a specific cake with specific values for the fields.
Synthesize
Based on these instances of CakeTypes you just wrote:
-
What is the name of the function that creates a CakeType?
-
What is the Domain of this function?
-
How many things are in the domain?
The three things in the domain of cake are, in fact, the three things that we have already listed on Data Structure (Page 12)! With data structures, the order is very important: we always want the first string in cake to be the CakeType’s flavor, the first number to be its number of layers, etc.
After clicking the "Run" button, in Pyret, type birthday-cake into the interactions area and hit enter. What do you get back?
Does this make sense? What happens when you type just a number into the interactions area? We get that same number back! What about Strings? Images? Booleans? If we don’t do anything to our input, or use any function on it, we get back exactly what we put in! Here, you put in a CakeType, let’s see what we get back. At first glance, it looks like a function call was the answer! But there’s a few things different about what appears in the output. First, it isn’t the same color as a normal function call, which is the first hint that something’s different. Second, we can click on it, and see that this value is storing three other values in its fields — the flavor, layers, and whether or not it’s ice cream. This compound value that’s printed is an instance of a CakeType. It’s a value in its own right, so when we type in birthday-cake it shows us this value (just like with numbers and
strings).
Remind students that values will always evaluate to themselves. 4 evaluates to 4, the string "pizza" evaluates to "pizza", and birthday-cake evaluates to cake("Vanilla", 4, false)
Getting data from a structure 40 minutes
Overview
Students are introduced to the synatx of doc accessors, which allow them retrieve data from instances.
Launch
Suppose you want to get the flavor out of chocolate-cake. You don’t care about the message, color, or anything else — you just want to know the flavor. Pyret has syntax for doing precisely that: .flavor.
If you type chocolate-cake.flavor into the interactions area, what should it evaluate to? Try it out!
-
What kind of thing did it return: A Number, String, Image, Boolean, or structure?
-
Practice taking the flavor out of every
CakeTypeyou have defined, using.flavor
Of course, there are ways to access any part of a CakeType, not just the flavor! What do you think you would get if you typed chocolate-cake.layers in the interactions area?
Try using the dot-accessors .layers and .is-iceCream on your CakeTypes! Do they do what you expect?
A way to prompt students to use these accessors is to ask: "How do you get the flavor out of a CakeType?" or "How do you get the layers out of a CakeType?" Throughout the course you can set up a call and response system with students, where the question "How do you get the X out of a Y?" will prompt the name of the accessor.
The previous syntax is known as Dot-Accessors. They allow you to specify exactly what part of a structure you want. If we want to know if we can fit a certain CakeType through a doorway, we probably care only whether the number of layers is less than a certain amount. Likewise, if we want to know whether or not a character in our game has lost, we need to know only if her health is less than 0: we might not care what her location is, or the color of her armor. Programmers use accessors a lot, because they often need to know only one piece of information from a complex data structure.
Our CakeType structure is defined using data CakeType: and the cake(…) lines, which tell the computer what things make up that structure, and what order and type each thing is. In return, we get new functions to use. Until we write these lines, we don’t have cake(…) (to make a Cake), .flavor (to get the flavor out of the Cake), .layers, or any other dot-accessors, because Pyret doesn’t know what a CakeType is — we haven’t defined it.
To see this for yourself, type a pound sign (#) before the line which begins with cake(…) and each of the fields. This comments out the definition, so that the computer ignores it. Hit run, and see what happens.
Investigate
Of course, when programmers work with data structures, they don’t just define them and create instances. They also write functions that use and produce structures. Let’s get started writing some functions for CakeTypes.
Turn to Word Problem: taller-than (Page 13) in your workbook. Write the contract and purpose statement for a function called taller-than, which consumes two CakeTypes, and produces true if the first CakeType is taller than the second.
-
What is the domain for this function?
-
What is the range of taller-than?
-
Which part(s) of the CakeTypes will you need to check to determine if one is taller than the other?
# taller-than :: CakeType, CakeType -> Boolean
# consumes two CakeTypes and produces true if the number of
# layers in the first CakeType is greater than the number of
# layers in the second
For your first example, try comparing birthday-cake and chocolate-cake. Do we care about what flavor either of these CakeTypes are? What about whether or not one of them is an ice cream cake? All we need to figure out which one is taller is their number of layers.
How do you get the number of layers out of birthday-cake? What about chocolate-cake? Write your first example to figure out if birthday-cake has a greater number of layers than chocolate-cake.
examples:
    taller-than(birthday-cake, chocolate-cake) is
    birthday-cake.layers > chocolate-cake.layers
end
-
Write one more example for the function taller-than, this time using it to compare any two CakeTypes you defined earlier.
-
Next, circle and label what changes between the two examples. How many variables will this function need? Then write the definition, using your examples to help you.
After replacing the changing things with variables, your definition should look similar to:
fun taller-than(a-cake1, a-cake2):
  a-cake1.layers > a-cake2.layers
end
Turn to Word Problem: will-melt (Page 14) in your workbook. Your bakery needs to know if certain CakeTypes needs to be refrigerated. If the temperature is greater than 32 degrees AND the given CakeType is an ice cream cake, the function should return true.
-
Fill out the Contract and Purpose Statement for the function.
-
Write two examples for how one would use
will-melt. -
Circle and label what varies between those examples and label it with a variable name.
-
Define the function.
Give students plenty of time to practice using dot-accessors, extracting pieces of the Cake structures and writing expressions that compute with them.
Synthesize
Optional: Bakery file, extend the CakeType data structure to include one more field: a message, represented as a String. (Make sure you remember to change each CakeType instance below the data definition: if a CakeType now contains four fields, each instance will need to include all four fields!) Next, write a function called birthday-cake, which takes in a string representing someone’s name, and produces a 2-layer, chocolate CakeType with “Happy birthday [Name]!” as the message. Hint: You’ll want to use the string-append function to combine two strings into one. Here is its contract: # string-append :: String, String -> String
Since this function returns a CakeType, remind students that they’ll need to use the cake constructor function to produce a CakeType.
Closing 5 minutes
Data Structures are a powerful tool for representing complex data in a computer program. Simple video games, like Pong, might need to keep track of only a few numbers at once, such as the position of the ball, position of each paddle, and the score. But if a game has many different enemies, each with its own position and health, or multiple levels with their own background images, the game can get very complicated very fast, and structures are a great way to manage and make sense of all the data. Programmers can do a LOT with data structures, and in the upcoming lessons you’ll start creating your own structures to make a customized animation.
These materials were developed partly through support of the National Science Foundation,
(awards 1042210, 1535276, 1648684, and 1738598).
Bootstrap:Reactive by Emma Youndtsmith, Emmanuel Schanzer, Kathi Fisler, Shriram Krishnamurthi, Joe Politz and Dorai Sitaram
is licensed under a
Creative Commons 4.0 Unported License.
Based on a work at www.BootstrapWorld.org.
Permissions beyond the scope of this license may be available by contacting
schanzer@BootstrapWorld.org.
Structures, Reactors, and Animations
Structures, Reactors, and Animations
Students create a complete animation (of a sunset) from scratch, and learn how to use data structures to capture the essence of an animation. They apply the put-image function to draw single frames from data structure instances, and write a function to generate new frame data from previous frame data. They learn how to use reactors to combine their data and functions into a full running animation.
Prerequisites |
None |
|||||||||||||||
Product Outcomes |
|
|||||||||||||||
Materials |
|
|||||||||||||||
Language Table |
|
- data structure
-
a datatype which packages several datatypes as fields
- field
-
a part of a data structure that has a name and holds a single value of a specified datatype
- function
-
a mathematical object that consumes inputs and produces an output
- handler
-
Connects an event (like a tick or keypress) and a function within a reactor
- instance
-
a specific, packaged value of a data structure that contains other values in its fields
- reactor
-
a value that contains a current state, and functions for updating, drawing, and interacting with that state
- state
-
the value of a changing system at any point in time (i.e. a stoplight can be in the 'red', 'yellow' or 'green' state). In Pyret, the state of a Reactor is it’s current value.
Animations in Pyret 55 minutes
Overview
Students are introduced to Reactors, Pyret’s mechanism for created animated time-based simulations or interactive programs. With Reactors serving as the bridge between making images and defining data structures, students begin to create simple animations.
Launch
You’ve learned how to create data structures, and how to create images. Now it’s time to put these together to create an animation in Pyret. We’ll even go a step further than what we did in Bootstrap:Algebra, creating an animation with movement in two dimensions.
In Bootstrap:Algebra, many decisions about your animation were made for you. We told you how many characters you had and which aspects of them could change during the animation. The danger always moved in the x-axis, the player always moved in the y-axis. In Bootstrap:Reactive, we give you much more control of your game: you decide how many characters you will have, and what aspects of them can change (position, color, size, etc). In order to have this flexibility, we need to do a little more work to set up the animation. Let’s break down an animation to see what we need.
Let’s create an animation of a sunset. The sun will start at the top-left corner of the screen and fall diagonally down and right across the sky. Here’s a running version of the animation we are trying to create. Notice that the sun dips below the horizon in the bottom-right corner.

In Bootstrap:Algebra, we talked about how an animation is made of a sequence of images that we flip through quickly. We continue to think of an animation as a sequence of images in Bootstrap:Reactive. For example, here are the first three frames of the sunset animation:

Where will we get this sequence of images? We don’t want to create them all by hand. Instead, we want to write programs that will create them for us. This is the power of computer programming. It can automate tasks (like creating new images) that might otherwise be tedious for people to do. There are four steps to creating animations programs. You’ve actually already done the first three in the first two units, but now we need to show you how to put them together.
This is a key point at which to emphasize why functions are important to computer science. Computers are good at repetition, but they need instructions telling them what steps to repeat. Functions capture those instructions.
Step 1: Define the data structure
The first step is to develop a data structure for the information that changes across frames. To do this, we need to figure out what fields our data structure will need.
Turn to Identifying Animation Data Worksheet (Page 17) in your workbook. Copy the three sunset images we gave you into the boxes at the top of the worksheet.
To identify the fields, we have to figure out what information is needed to create each frame image. Information that changes from frame to frame must be in the data structure.
On your worksheet, fill in the table just below the three images to indicate what information changes across the frames.
Hopefully, you identified two pieces of changing information: the x-coordinate of the sun and the y-coordinate of the sun. Each image also contains the horizon (the brown rectangle), but that is the same in every frame. Let’s write down a data structure that captures the two coordinates.
Fill in the second table, giving a name and type for each of the x-coordinate and y-coordinate. Then fill in the SunsetState data structure definition that we started for you at the bottom of the page. Use sunset as the name of the constructor.
You should have come up with something like this: a data block with numbers for the two coordinates.
# a SunsetState is the x-coordinate of the sun
# and the y-coordinate of the sun
data SunsetState:
 | sunset(
     xpos :: Number,
     ypos :: Number)
end
The term state is used in computer science to refer to the details of a program at a specific point in time. Here, we use it to refer to the details that are unique to a single frame of the animation.
We have the students copy the images into the workbook partly to make sure they understand what images they are working with and partly so that they have a self-contained worksheet page for later reference.
What’s in a Name? We are adopting a convention here, in which we include "State" in the name of the data block, then use the same base name (without "State") for the constructor. By not conflating the names here, students should have an easier time distinguishing between the constructor name and data structure name. |
Any time we make a data structure, we should make some sample instances: this helps check that we have the right fields and gives us data to use in making examples later.
Investigate
At the bottom of the worksheet, use the sunset constructor to write write down the SunsetState instance for the first frame (labeled “Sketch A”). It has x-coordinate 10 and y-coordinate 300.
Step 2: Draw one frame
The second step in making an animation is to write a function that consumes an instance of one state and produces the image for that instance. We call this function draw-state. For sunset, draw-state takes a SunsetState instance and produces an image with the sun at that location (dipping behind the horizon when low in the sky). This function should use put-image, as we did with the hikers in unit 1.
Go to Word Problem: draw-state (Page 19) in your workbook and develop the draw-state function described there. Type in your function and use it (in the interactions window) to draw several individual sunset frames.
You may have noticed that we used SunsetState instead of sunset as the domain name. Remember that sunset is just the name of the constructor, while SunsetState is the name of the type. We use SunsetState whenever we need a type name for the domain or range.
We can now draw one frame, but an animation needs many frames. How can we draw multiple frames? Let’s simply the problem a bit: if you have the instance for one frame, how do we compute the instance for the next frame? Note we didn’t ask how to produce the image for the next frame. We only asked how to produce the next SunsetState instance. Why? We just wrote draw-state, which produces the image from a SunsetState. So if we can produce the instance for the next frame, we can use draw-state to produce the image.
Step 3: Produce the next frame instance
The third step in making an animation is to write a function that consumes an instance of one state and produces the instance for the next state. We call this function next-state-tick. For sunset, next-state-tick takes a SunsetState instance and produces a SunsetState instance that is just a little lower in the sky.
Go to Word Problem: next-state-tick (Page 20) in your workbook and develop the next-state-tick function described there. Use the sample SunsetState instances that you developed in step 1 as you make your examples of the function. Then, type in the code you have so far (including the data definition for SunsetState into the sunset starter file, and make sure your examples are producing the expected answers.
Together, the draw-state and next-state-tick functions are the building blocks for an animation. To start to see how, let’s first use these two functions to create the first several frames of an animation by hand (then we’ll show you how to make more frames automatically).
Run each of the following expressions in the interactions window in turn. Just copy and paste them, rather than type them by hand each time:
-
draw-state(sunset(10,300)) -
next-state-tick(sunset(10,300))
Now use draw-state on the result of next-state-tick, then call next-state-tick again:
-
draw-state(sunset(18,296)) -
next-state-tick(sunset(18,296)) -
draw-state(sunset(26,292)) -
next-state-tick(sunset(26,292))
Do you see the sun getting lower in the sky from image to image? Do you see how we are creating a “chain” of images by alternating calls to draw-state and next-state-tick? We use next-state-tick to create the instance for a new frame, then use draw-state to produce the image for that frame.
(Optional) Here’s another way to see the same sequence of expressions. Run each of the following expressions in the interactions window in turn. Just copy and paste them, rather than type them by hand each time:
-
draw-state(sunset(10,300)) -
draw-state(next-state-tick(sunset(10,300))) -
draw-state(next-state-tick(next-state-tick(sunset(10,300)))) -
draw-state(next-state-tick(next-state-tick(next-state-tick(sunset(10,300)))))
Do you see what this sequence of expressions does? Each one starts with the sun in the upper-left corner, calls next-state-tick one or more times to compute a new position for the sun, then draws the state. Notice that this sequence only has us write down one SunsetState instance explicitly (the first one). All the others are computed from next-state-tick. If we could only get Pyret to keep making these calls for us, and to show us the images quickly one after the next, we’d have an animation!
Step 4: Define an animation with a reactor
The fourth (and final) step in making an animation is to tell
Pyret to create an animation using an initial SunsetState
instance and our draw-state and next-state-tick functions. To do
this, we need a new construct called a reactor. A reactor gathers
up the information needed to create an animation:
-
An instance of the data at the start of the animation
-
(Optional) A function that knows how this data should change automatically as time passes
-
(Optional) A function that knows how to take this data and draw one frame of the animation
A reactor is designed to “react” to different events. When the
computer’s clock ticks, we’d like to call next-state-tick on the
reactor’s state, and have it update to the next state
automatically. Reactors have event handlers, which connect events
to functions.
Here, we define a reactor named sunset-react for the sunset animation:
sunset-react = reactor:
  init: sunset(10, 300),
  on-tick: next-state-tick,
  to-draw: draw-state
end
init tells the reactor which instance to use when the program
starts. In this example, the program will start with a
SunsetState instance with the sun at (10, 30). on-tick and
to-draw are event handlers, which connect tick and draw events to
our next-state-tick and draw-state functions.
Copy this reactor definition into your sunset animation program.
Common Misconceptions
Separating the instance from the image of it is key here: when we produce an animation, we actually produce a sequence of instances, and use draw-state to produce each one. Students may need some practice to think of the instance as separate from the image that goes into the animation.
If you run your sunset program after adding the reactor, nothing seems to happen. We have set up an animation by defining sunset-react, but we haven’t told Pyret to run it. You could define multiple reactors in the same file, so we have to tell
Pyret explicitly when we want to run one.
Type interact(sunset-react) in the interactions window to run your sunset animation.
What happens when we call interact? The following diagram summarizes what Pyret does to run the animation. It draws the initial instance, then repeatedly calls next-state-tick and draw-state to create and display successive frames of your animation.
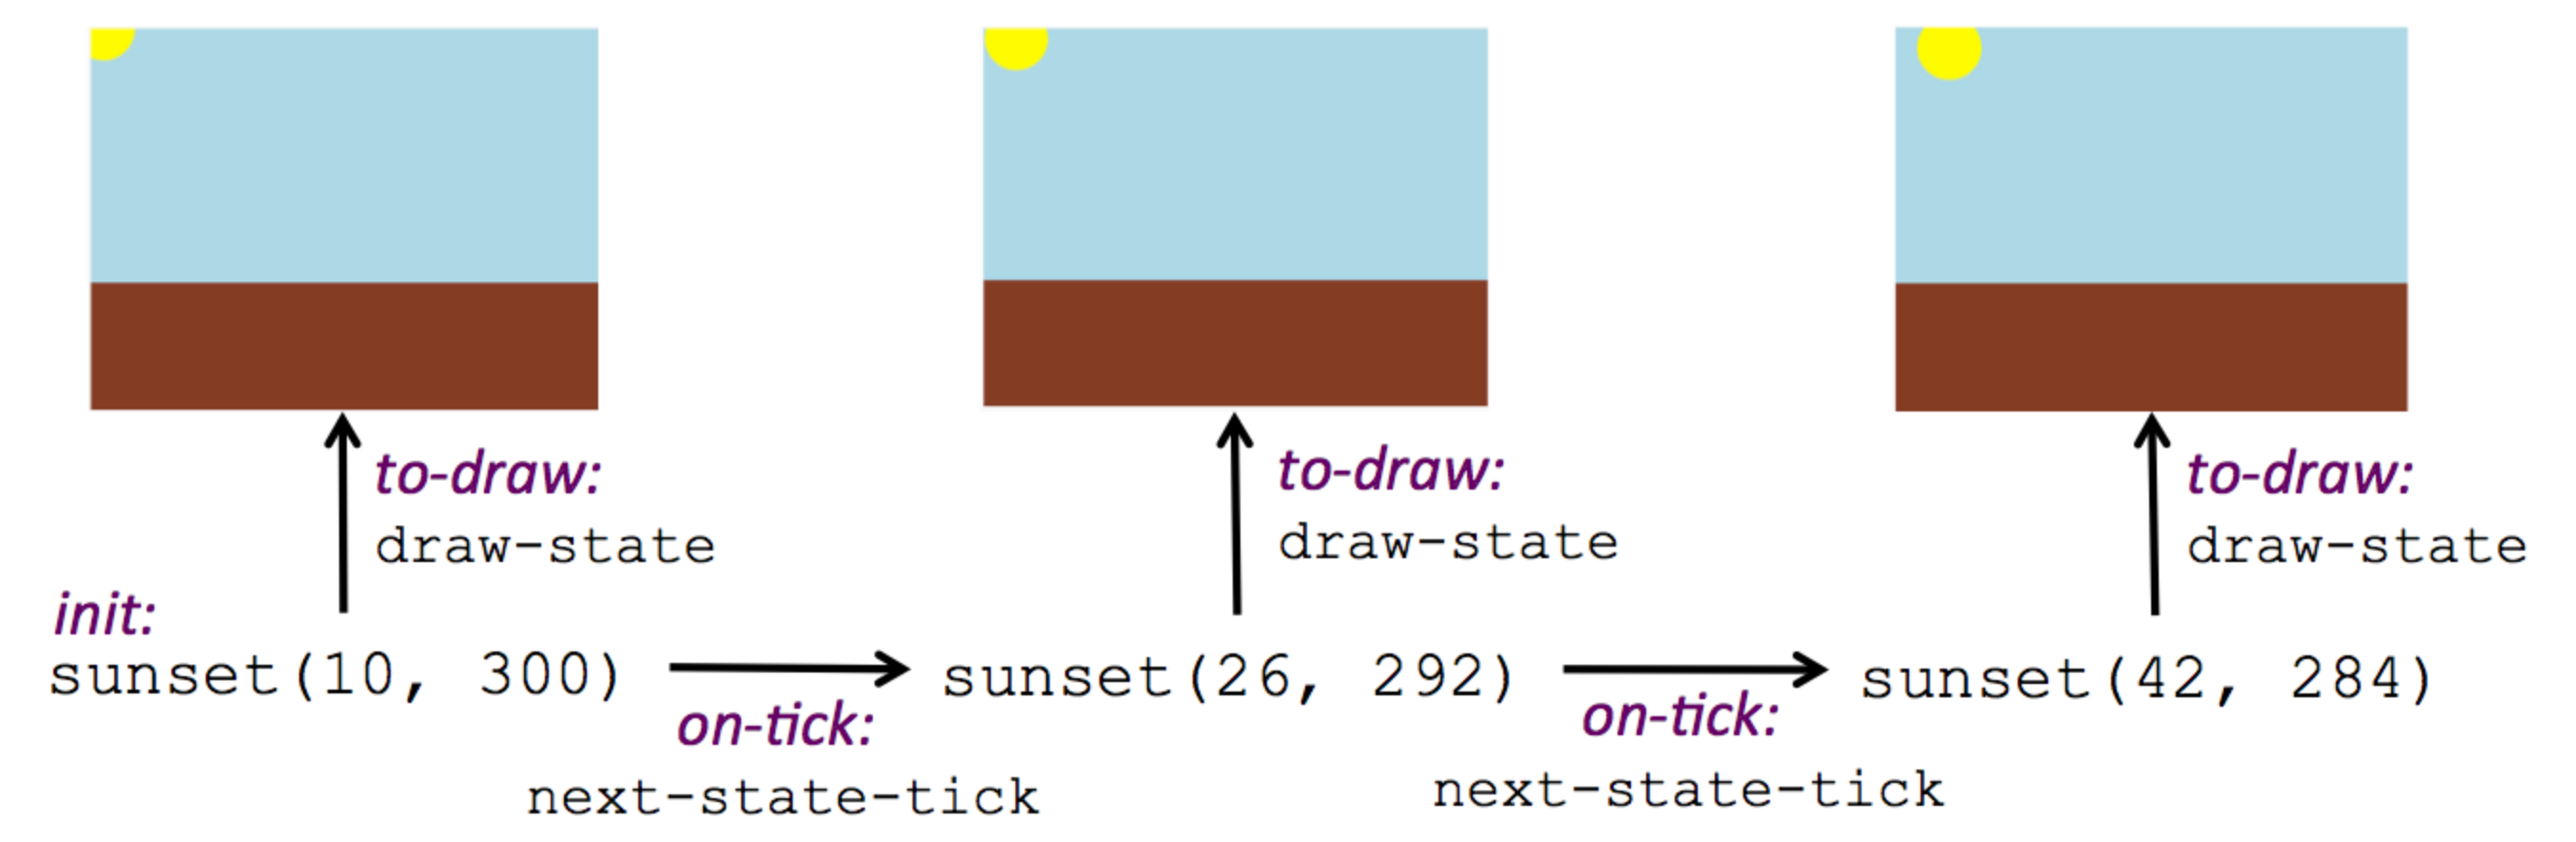
These are the same computations you did by hand in the interactions window a little while ago, but Pyret now automates the cycle of generating and drawing instances. By having functions that can generate instances and draw images, we can let the computer do the work of creating the full animation.
Functions are essential to creating animations, because each frame comes from a different SunsetState instance. The process of drawing each instance is the same, but the instance is different each time. Functions are computations that we want to perform many times. In an animation, we perform the draw-state and next-state-tick functions once per frame. Animations are an excellent illustration of why functions matter in programming.
Synthesize
Summarizing what we have seen so far, we have to write four things in order to make an animation:
-
Create a data structure to hold the information that changes across frames. This information is called the state.
-
Write a function to generate an image of the current state (we’ll call this
draw-state). -
Write a function to generate a new state from a given state (we’ll call this
next-state-tick). -
Define a {reactor} that will use an initial instance of the state and the two functions to create an animation.
At this point, you could create your own animation from scratch by following these four steps. If you do, you may find it helpful to use one of the animation design worksheets at the back of your workbook: it takes you through sketching out your frames, developing the data structure for your animation state, and writing the functions for the animation. It also gives you a checklist of the four steps above. The checklist mentions a fifth (optional) step, which involves getting your characters to respond when the user presses a key. You’ll learn how to do that in the next unit.
The animation-design worksheet is a condensed summary of the steps to creating an animation. If your students still need more scaffolding, follow the sequence of sheets that we used to develop sunset, including explicit worksheets for draw-state and next-state-tick. If your students are doing fine without the scaffolding of the design recipe worksheets, the condensed worksheet should suffice to keep them on track (though they should still write tests and follow the other steps of the design recipe as they work).
You have just seen the incredible power of functions in programming! Functions let us generate content automatically. In the early days of making cartoons, artists drew every frame by hand. They had to decide at the beginning how many frames to create. Here, we let the computer generate as many frames as we want, by letting it call next-state-tick over and over until we stop the animation. If we want to slow down the sunset, we simply change the new coordinates within next-state-tick. If we start with a larger screen size, the computer will continue to generate as many images as we need to let the sun drop out of the window. The computer can give us this flexibility as long as we provide a function that tells the computer how to generate another frame.
From Animations to Structures 55 minutes
Overview
An animation that only changes one number (e.g. - the x-coordinate of a plane flying across the sky, or the y-coordinate of a balloon floating upwards) uses that number as the Reactor state. But what if we wanted to do something more complex, which relied on keeping track of more than one number? This activity uses more complex animation to motivate the need for data structures.
Launch
 🖼Show image
You’ve learned the components of an animation in Pyret. The data structure for the state lies at the heart of the animation: each of the initial state, the
🖼Show image
You’ve learned the components of an animation in Pyret. The data structure for the state lies at the heart of the animation: each of the initial state, the draw-state function and the next-state-tick function are based on the data structure you choose. Being able to figure out the data structure you need for an animation is therefore a critical skills in making your own animations. In this lesson, we are going to practice identifying the data and creating the data structures for various animations. We will not write the entire animation. We are just going to practice identifying the data and writing the data structures.
Investigate
Exercise: Jumping Cow — Look at this animation of a cow jumping over the moon.
Go to Identifying Animation Data Worksheet (Page 17) in the workbook. Draw three frames from this animation. Choose ones that highlight differences across the frames. The frames don’t need to be consecutive.
When you chose which frames to draw, did you include ones with different images or heights of the cow? Choosing images with some variation will help you think through the data in your animation.
Fill in the table of what information changes across the frames.
In this case, the cow’s x-coordinate and y-coordinate are both changing. The image changes too, but the position (coordinates) determines which image to use. The state data structure therefore only needs to store the coordinates.
Fill in the table of what fields you need for each piece of changing information. Write a data structure CowState to capture the data in this animation.
If students want to include the image in the state, that is fine too. Examples like this are good for raising discussion about what parts of an animation depend on one another. The image doesn’t need to be in the state, but it isn’t wrong to include it there either.
 🖼Show image
Exercise: Bicycle Ride — Look at this animation of a person riding a bicycle along a street.
🖼Show image
Exercise: Bicycle Ride — Look at this animation of a person riding a bicycle along a street.
Go to the next animation worksheet page in the workbook. Draw three frames from this animation. Choose ones that highlight differences across the frames. The frames don’t need to be consecutive. Then, fill in the table of what information changes across the frames.
In this case, there are two pieces of information: the x-coordinate of the cyclist, and the angle of rotation of the bike tires.
Fill in the table of what fields you need for each piece of changing information. Write a data structure BikeState to capture the data in this animation.
 🖼Show image
Exercise: Pulsing Star — Look at this animation of a star that pulses as it moves across the sky.
🖼Show image
Exercise: Pulsing Star — Look at this animation of a star that pulses as it moves across the sky.
Go to next animation worksheet page in the workbook. Draw three frames from this animation. Choose ones that highlight differences across the frames. The frames don’t need to be consecutive.
When you chose which frames to draw, did you show the star getting smaller and then getting larger again?
Fill in the table of what information changes across the frames.
The x- and y-coordinates of the star change, as does the size of the star. These changes are easy to see across two frames. Something else changes too, but you have to look across at least three frames to see it. Imagine you had a single frame with the star at size 25. In the next frame, should the star be larger or smaller? It’s hard to tell, because we don’t know whether the star is currently in a “growing” phase or a “shrinking” one. This animation actually has a fourth state field: the direction of growth of the star. When the star is getting bigger, the star’s size should increase in the next frame. When the star is getting smaller, the size should decrease in the next frame.
Fill in the table of what fields you need for each piece of changing information. Write a data structure StarState to capture the data in this animation.
What type did you choose for the field that tracks the direction of growth? You have several choices: a boolean such as is-growing, a string such as direction (with values "grow" or "shrink"), or a number such growth-rate which is the amount to add to the size from state to state (a positive value grows the star while a negative value shrinks it). The code for next-state-tick will be cleaner if you use the number, but the others make sense before you’ve thought ahead to the code.
 🖼Show image
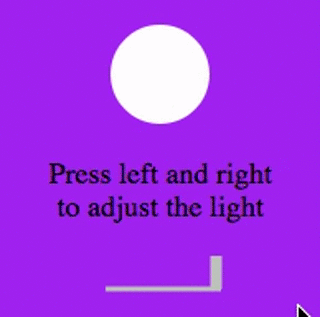
Exercise: Light Dimmer — Look at this animation of a slider to control the brightness of a light.
🖼Show image
Exercise: Light Dimmer — Look at this animation of a slider to control the brightness of a light.
Go to the next animation worksheet in your workbook. Draw three frames from this animation. Choose ones that highlight differences across the frames. The frames don’t need to be consecutive.
When you chose which frames to draw, did you include the far left position when the light goes out? It can be useful to think about the extreme cases when picking frames to focus on.
Fill in the table of what information changes across the frames.
In this case, we see two things changing: the y-coordinate of the slider and the brightness of the light. You could have one field for each of these. Or, you could just have a field for the y-coordinate and compute the brightness from that value (you can control the brightness of a shape by putting a number from 0 to 255 in place of "solid" or "outline" in the arguments to the shape-image functions).
Fill in the table of what fields you need for each piece of changing information. Write a data structure LightState to capture the data in this animation.
Exercise: Pong — For a real challenge of your data structure design skills, figure out the world data structure needed for a single-paddle pong game (a ball bouncing off the walls and a single user-controlled paddle). If you want to build an entire Pong game, see the optional unit on how to do this.
Closing 5 minutes
You’ve learned how to create an animation in Pyret. You’ve learned how to create a data structure for the state of your animation. You’ve written a function to draw the frame for one instance of your state data. You’ve written another function to produce the state instance for the next frame, and you’ve learned how to write a reactor to create an animation from these pieces. Your state data structures can contain information far beyond the coordinates for players: you can include images, sizes of characters, colors of elements, and so on. Once you control the data structure, you can create much richer animations than you could in Bootstrap:Algebra. Coming up, we will show you how to use keys to control your players. Later, we show you how to add other common game features to your Bootstrap:Reactive programs.
These materials were developed partly through support of the National Science Foundation,
(awards 1042210, 1535276, 1648684, and 1738598).
Bootstrap:Reactive by Emma Youndtsmith, Emmanuel Schanzer, Kathi Fisler, Shriram Krishnamurthi, Joe Politz and Dorai Sitaram
is licensed under a
Creative Commons 4.0 Unported License.
Based on a work at www.BootstrapWorld.org.
Permissions beyond the scope of this license may be available by contacting
schanzer@BootstrapWorld.org.
Functions That Ask Questions
Functions That Ask Questions
Students are introduced to conditionals using if-expressions, on both built-in data (like numbers) and on programmer-defined data structures. They then use conditionals to implement an animation that goes through distinct phases. They also learn about helper functions, which abstract away frequently-used code to improve readability and reduce duplication.
Prerequisites |
None |
|||||||||||||||
Product Outcomes |
Students learn conditional expressions by writing a simple function |
|||||||||||||||
Materials |
|
|||||||||||||||
Language Table |
|
- helper function
-
a small function that handles a specific part of another computation, and gets called from other functions
- piecewise function
-
a function that computes different expressions based on its input
What to Wear 20 minutes
Overview
Students are introduced to Pyret’s if-then-else construct.
Launch
Sometimes we want our functions to behave one way for a certain input or condition, but a totally different way for a different input or condition. Piecewise functions in mathematics also have this property (think about absolute value!). So how do we write conditionals in Pyret?
Investigate
Open the file at What to Wear. After reading through the definition for the wear function:
-
Click Run, so that you can use
wearin the interactions area. -
What does
wear(50)evaluate to? -
What does
wear(100)evaluate to? -
What is the domain and range of the
wearfunction? -
What is the name of the variable in the
wearfunction? -
Change the
wearfunction to return the shorts outfit when it’s cold (less than 30 degrees).
Synthesize
An if expression has four parts:
-
An
ifclause -
Any number of
else ifclauses -
An optional
elseclause -
An
endkeyword
The if clause has a question, followed by a : (a colon), followed by an answer for if the question evaluates to true. Each else if clause also has a question, followed by a colon, followed by an answer for if the question evaluates to true. The else: clause runs if none of the questions in the other clauses evaluated to true. It catches all the cases that aren’t covered by a specific question in one of the if or else if clauses.
The else: clause at the end of an if expression is optional. Typically, it is important to make sure your code will account for all possible conditions, and ending with else: is a useful catchall condition if all of the other conditions return false. However, this is optional in the case that every single possible condition is covered by else if statements.
At this point, we need to introduce an extension to the Design Recipe, to allow it to handle conditionals. If we look at the examples for wear, and circle everything that changes, both the input (the temperature) and the output (the image) change. However, wear only has a single variable according to the domain in its contract. Also, the image is completely dependent on the temperature — it isn’t a separate independent variable, so it wouldn’t make sense for it to be another element in the domain of wear. The fact that we have more changing things than elements in the domain tells us that wear must be a piecewise function. This is the same rule as in Bootstrap:Algebra, and just as we could in Racket, we can tell that a function must be piecewise just by looking at its contract and the examples. This helps us identify when a function we are writing in our games needs to use if, as long as we follow the Design Recipe when building it. Another way to recognize a piecewise function when looking at your examples is to note whether or not there are elements which completely depend on another. In wear, the image depends on the temperature, and does not change independently, or in response to any other changes in the function. Keep an eye out for these dependent variables in your examples as you write them to help identify piecewise functions.
This is an important point to review. Conditionals, or Piecewise functions, are a big moment in Bootstrap:Algebra, and the extension of the Design Recipe is key for students to design their own piecewise functions later on. In the next exercise, make sure they use the Recipe steps to remind them of the mechanics of this type of function.
Where’s my Order? 35 minutes
Overview
Students connect conditional functions with behaviors in games, and write one from scratch.
Launch
Let’s revisit the package delivery drone from earlier. We’re going to write a function that tells us where the package is for a given DeliveryState. This is the kind of function you might need to write later on in your game. For example, you may need to know whether a character has reached a portal at a certain part of the screen to advance to the next level, or if they’ve fallen into dangerous lava!
Investigate
 🖼Show image
Open your workbook to Word Problem: location (Page 30). Use the design recipe to write a function to tell you where the falling box is (either “road”, “house”, “delivery zone”, or “air”), based on the
🖼Show image
Open your workbook to Word Problem: location (Page 30). Use the design recipe to write a function to tell you where the falling box is (either “road”, “house”, “delivery zone”, or “air”), based on the DeliveryState.
+
Once you’ve completed the problem on paper, open the Where’s my Order? file. We’ve gotten you started with the contract and purpose statement for location in the file.
# location :: DeliveryState -> String
# Consumes a DeliveryState and produces a String
# representing the location of the box:
# either "road", "delivery zone", "house", or "air"
Copy the work you have in your workbook to implement location on the computer.
In addition to writing your examples, you can also check that the location function’s behavior matches what a drawing of a DeliveryState instance shows. For example, if location returns "road" on some input, when we draw that same input, it ought to look like the package has landed in the road!
Experiment with this function!
-
Click "Run" to compile your program, then close the animation window.
-
In the interactions area, evaluate
location(START). What does it return (hopefully"air")? -
Evaluate
draw-state(START). Does it look like the box is in the air? -
Do the same for an instance of a DeliveryState where the box is in the road, on the house, and in the delivery zone.
Synthesize
These experiments show an important connection between functions that work with instances of a data structure, and the way we draw those instances. In our design for the animation, we have an understanding of what different regions of the screen mean. Here, we see that the draw-state and location functions both share this understanding to give consistent information about the animation.
Piecewise Bug Hunting 15 minutes
Overview
Students flex their conditional-function muscles, by looking at buggy conditions and figuring out what went wrong.
Launch
Investigate
Open your workbook to Syntax and Style Bug Hunting: Piecewise Edition (Page 31). In the left column, we’ve given you broken or buggy Pyret code. On the right, we’ve given you space to either write out the correct code, or write an explanation of the problems with the provided code. Work through this workbook page, then check with your partner to confirm you’ve found all the bugs!
Colorful Sun 30 minutes
Overview
Students return to an animation they’ve created before, and enhance it by using conditionals.
Launch
Let’s return to your sunset animation from the previous unit. Currently, the sun’s x and y-coordinate change to make it move across the screen and disappear behind the horizon. In this unit, we’ll make the animation a bit more realistic, by changing the color of the sun as it gets lower in the sky. At the top of the screen, the sun should be yellow, then change to orange as it gets to the middle of the screen, and then become red as it reaches the bottom, close to the horizon.
In programming, it is fairly common that you will change a program that you’ve already written to do something new or different. Modifying existing code is a valuable skill, and one that we want to practice with this exercise. It is so useful, in fact, that we’ve created a worksheet to help you map out what needs to change in an existing animation to support new behavior.
Investigate
Turn to Page 33. Fill in the description of the animation change and three sample images at the top of the first page. If you don’t have colored pencils, just make an annotation near each sketch as to what color the sun should be in that sketch.
Once you know what new behavior you want, the next task is to build it into your code. The next two tables in the worksheet ask you to think about the NEW features that are changing in your game and how you might capture them.
Talk with your partner about what new information is changing and how you might build that into your program. Does the color change in a predictable way? Is the color a new field that is independent of the fields you already have? Based on your answer, do you think you will need to add something new to your SunsetState data structure, or can you change the look of your animation based on what is already there?
There are a number of ways students can solve this problem. Once students have brainstormed with their partners, have a classroom discussion to have pairs share their ideas.
Since the color of the sun will be changing, we could add a field to the SunsetState data structure, such as a String with the current color name. However, the color will not change independently: we want the color to change based on the position of the sun in the sky, and get darker as it gets lower. Let’s figure out how to make the sun color change based only on the fields we already have.
Fill in the table at the bottom of the worksheet assuming we are not changing the data structure: which components (including existing functions) need to change?
If we have decided not to add fields, you should have marked that the draw-state method changes, but nothing else needs to. We only change next-state-tick and next-state-key if there has been a change to the data structure.
You may need to guide students to realizing that a change in the appearance of the animation can be done entirely through draw-state. This is another point for emphasizing the separation between maintaining instances and drawing instances.
How do we change draw-state? Our first instinct may be to turn it into a piecewise function, and draw something different when the SunsetState’s y-coordinate gets below 225 or below 150. This would yield code along the lines of:
fun draw-state(a-sunset):
  if a-sunset.y < 150:
    put-image(
    rectangle(WIDTH, HORIZON-HEIGHT, "solid", "brown"),
              200, 50,
              put-image(circle(25, "solid", "yellow"),
                        a-sunset.x, a-sunset.y,
     rectangle(WIDTH, HEIGHT, "solid", "light-blue")))
  else if a.sunset.y < 225:
    # same code with "orange" as sun color
  else:
    # same code with "red" as sun color
 end
end
Notice that this version contains three very similar calls to put-image. The only thing that is different about these three calls is the color we use to draw the sun. Whenever you find yourself writing nearly-identical expressions multiple times, you should create another function that computes the piece that is different. You can then write the overall expression just once, calling the new function to handle the different part. Functions that handle one part of an overall computation are called helper functions.
Assume for the moment that we had written a helper function called draw-sun that takes a SunsetState and returns the image to use for the sun. If we had such a function, then our draw-state function would look as follows:
fun draw-state(a-sunset):
  put-image(
  rectangle(WIDTH, HORIZON-HEIGHT, "solid", "brown"),
            200, 50,
            put-image(draw-sun(a-sunset),
                      a-sunset.x, a-sunset.y,
        rectangle(WIDTH, HEIGHT, "solid", "light-blue")))
end
Open your workbook to Word Problem: draw-sun (Page 34). Here we have directions for writing a function called draw-sun, which consumes a SunsetState and produces an image of the sun, whose color is either “yellow”, “orange”, or “red” depending on its y-coordinate.
The word problem assumes a background scene size of 400x300 pixels. Once students use their draw-sun function in their animation, they may need to change the specific conditions if they have a much larger or smaller scene.
Once you’ve completed and typed the draw-sun function into your sunset animation program, modify draw-state to use it as we showed just above.
Now let’s think about having the sunset animation "`start again`"after the sun sets, with the sun reappearing in the upper-left corner.
Assume you edited your animation to restart the sun at the upper left after it sets. What color should the sun be when it appears at the upper-left the second time around? What color will it be based on your code? Will it be yellow again, or will the color have changed somehow to red?
To figure this out, think about what controls the color of the sun in your current code.
Edit the sunset animation so that the animation restarts.
-
Which of your functions has to be modified to include this change?
-
Is restarting fundamentally about drawing one frame or about generating new instances?
-
Use that question to help yourself figure out which function to modify. You could use the space for examples of functions at the end of your worksheet on extending the animation to write a new example before you modify your code.
Synthesize
This question about the color of the sun is an especially good question-and it likely to come up-from students who may have experience programming with variables and updates in other languages, such as Scratch (where the color would have changed to red). In our approach, where we simply determine the sun color from the y-coordinate, the sun should naturally restart as yellow. Of course, if students had maintained the sun color as a separate field in their data structure, they would have to consider this issue, and manually reset the sun color as well as the y-coordinate when restarting the animation.
Optional: In addition to changing the color of the sun, have the background color change as well: it should be light blue when the sun is high in the sky, and get darker as the sun sets.
Like changing the color of the sun, there are multiple valid ways of completing this optional activity. If you have students solving the same problem with different code, have them share their code with the class and have a discussion about the merits of each version.
These materials were developed partly through support of the National Science Foundation,
(awards 1042210, 1535276, 1648684, and 1738598).
Bootstrap:Reactive by Emma Youndtsmith, Emmanuel Schanzer, Kathi Fisler, Shriram Krishnamurthi, Joe Politz and Dorai Sitaram
is licensed under a
Creative Commons 4.0 Unported License.
Based on a work at www.BootstrapWorld.org.
Permissions beyond the scope of this license may be available by contacting
schanzer@BootstrapWorld.org.
Key Events
Key Events
Students are introduced to another type of event, called on-key. They define a key-event handler that modifies a reactor state to move a character when certain keys are pressed. To handle multiple possible keys, students return to the subject of piecewise functions, giving them more practice with Pyret’s if expressions.
Prerequisites |
None |
|||||||||||||||
Product Outcomes |
|
|||||||||||||||
Materials |
|
|||||||||||||||
Language Table |
|
- event
-
something that happens outside of a running program, which the program can respond to
- handler
-
Connects an event (like a tick or keypress) and a function within a reactor
- reactor
-
a value that contains a current state, and functions for updating, drawing, and interacting with that state
2D Character Movement 45 minutes
Overview
Students learn about events, and add key-event handling to their games.
Launch
We’ve already seen one kind of interactivity in our programs: getting the next state from the current state on a tick-event. This is perfect for animations that happen on their own, without any user intervention. In a game, that might be clouds moving across the sky or a ball bouncing on its own. An important kind of behavior in interactive programs is to respond user input, such as keypresses. A keypress, like the tick of a clock, is a kind of event, and we’ll re-use the idea of an event handler like on-tick and a function like next-state-tick. For key-events, the event handler is called on-key, and our function next-state-key will compute the next state from the current one after a key event. We’re going to use this idea to build up a reactor with a character moving in two dimensions, where the movement is triggered by keypresses.
Open up the Moving Character Starter File.
It contains a data block for representing a character’s position (CharState) that has an x and y position.
Write an example instance of a CharState where both the x field and the y field are between 100 and 500. Give it the name middle. We’ve filled in a picture of Sam the Butterfly from Bootstrap:Algebra. There is a drawing function called draw-state provided that simply draws the character image on a white background at the x and y coordinate in a CharState.
Run the program, and use draw-state to draw the example instance you created above. Did it appear where you expected?
This is a reminder that it’s often useful, when working on programs that use data to represent positions in an image, to make sure we understand what values in the data structure correspond to which drawing behavior.
Write an example instance that represents the butterfly in the top-right corner of the window. Give it a meaningful name of your own choice. Re-run the program, and check using draw-state that it showed up where you expect.
There is also a contract for a function next-state-key, which looks like:
# next-state-key :: CharState, String -> CharState
# Moves the character by 5 pixels
# in the corresponding direction
# if an arrow key ("up", "left", "down", or "right")
# is pressed, & leaves the character in place otherwise
How does the contract of next-state-key differ from the contract of next-state-tick in your previous programs?
It is different from the contract for next-state-tick (which handles tick events) in an important way. When a key event happens, the next state may differ depending on which key was pressed. That means the next-state-key function needs both the current state and which key was pressed as parts of its domain. That’s why next-state-key has an additional String input, which represents the key pressed by the user.
Create an example instance that corresponds to the position 5 pixels to the right of the example instance you wrote above. Use draw-state to check it, as before.
This gives us a good input and output test for the examples block when working on next-state-key. What call to next-state-key should connect these two example instances?
Investigate
Use the Design Recipe to fill in your examples and definition of next-state-key. Use the sample instances you created before in the examples block.
It’s an important point that next-state-key takes in an extra piece of information: the pressed key. This makes it much richer in terms of its purpose statement, which should describe what different keys ought to do to the state of the reactor. Students will create something like this completed file by adding a next-state-key function
Once you’ve implemented next-state-key, experiment with it in the interactions area:
-
Try
draw-state(next-state-key(middle, "left")). How is the output different fromdraw-state(middle)? -
Try using a few different calls to
next-state-keyto move the character several times, then draw it. For example:draw-state(next-state-key(next-state-key(middle, "left"), "up"))
As with tick-events, we can manually pass keypress strings into this function, see what the next state would be, and even draw that state to see what it looks like. That’s great, but we still want to hook this function up to a reactor, so that it actually handles keypresses from a user playing the game. To do this, we need to create a reactor use on-key to specify that our next-state-key function should be called when the user presses a key (we don’t need to specify an on-tick handler, since for now the only movement in our program comes from keypresses). Our reactor with a to-draw and on-key handler looks like this:
char-react = reactor:
  init: middle,
  to-draw: draw-state,
  on-key: next-state-key
end
Make your program create a reactor by that uses the on-key handler with the next-state-key function you just implemented. Run the program and use interact(char-react) to start the reactor. Does it work the way you expected? If it doesn’t, check:
-
Does the program have any typos or syntax errors?
-
Do the examples of
next-state-keymatch what you expect, creating a newcharinstance with appropriate x and y values? -
Do the examples pass the implementation of
next-state-key? -
Did you remember to add
on-keyto the reactor? -
Did you remember to re-run the program and use
interactto start the animation?
With this working, you can see the behind-the-scenes work that was going on in Sam the Butterfly from Bootstrap:Algebra. To get to the same point as in Bootstrap:Algebra, we’d next implement is-onscreen to check if Sam has left the board, and use it in next-state-tick.
Synthesize
Act out a reactor with key-events. You will need four students: one who acts as the next-state-key function, one who acts as the keyboard (you could also have the class act as a keyboard by having students shout out keys), one who acts as the reactor, and one who acts as the draw-state function. Give each student a few sheets of paper and something to write with.
When a key is "pressed" by the keyboard, the reactor write the current state and the key that was pressed, then shows their paper to next-state-key. next-state-key produces a new state based on the current state and the key, writes it down, and then hands the new state back to the reactor. The reactor discards their old state, replacing it with the new one, and shows the new one to draw-state. draw-state produces an image for the reactor to post, and draws it on paper. They hand the image to the reactor, who holds it up as the new frame in the animation. We recommend not having a next-state-tick function for this activity, to keep the focus on key events. You can add a on-tick handler in a separate stage when talking through games which have both time- and key-based events.
Optional: implement boundaries to keep character onscreen, using the same ideas as safe-left and safe-right from before. You can also write safe-top and safe-bottom, and use all of them to keep the character fully on the screen.
Optional: use num-to-string and text to display the position at the top of the window.
Combining Ticks and Keypresses 45 minutes
Overview
This activity introduces students to Reactor programs that use key-events and tick events. Students create a "digital pet", which responds to key commands but also changes state on its own.
Launch
Now, you’ve seen how to use functions to compute the next state in a game or animation for both tick and key events. We can combine these to make an interactive “digital-pet” from scratch!
Open the Virtual Pet Starter file. Run it. You will see a frame come up, showing a cat face and green status bars for the cat’s sleep and hunger.
Notice that not much is happening! To make this game more interesting, we want to add three behaviors to it:
-
as time passes, the hunger and sleep values should decrease
-
a human player should be able to increase hunger and sleep through keypresses
-
the image of the cat should change when hunger and sleep both reach 0 (and the player loses the game)
Investigate
In this lesson, you will extend the animation three times, once for each of these behaviors, by adding or changing the functions that make up an animation. To do this, you will use the Animation Extension Worksheet three times. Note that none of these should require adding any new fields to the data definition, just adding and editing functions like next-state-tick, next-state-key, and draw-state. We will walk you through the first use of the animation extension worksheet, then let you try the other two on your own.
Extension 1: Decrease Hunger and Sleep on Ticks
For this extension, we want to decrease the hunger by 2 and the sleep by 1 each time the animation ticks to a new frame.
Open your workbook to Animation Data Worksheet (Page 36) and Page 37, which shows you the extension worksheet filled in for this extension.
In this filled-in worksheet, the description from the problem is written down into the "goal" part of the worksheet. This is like the “purpose statement” for the feature.
Think about what sketches you would draw to illustrate the animation with this new behavior. Then check out the ones we drew on the example worksheet. Notice that they focus on the bars having different lengths.
Next, we consider the tables that summarize what now changes in the animation.
What changes between frames now that didn’t in the starter file for the virtual pet?
The worksheet identifies that both hunger and sleep are changing in new ways. Since they aren’t new fields, this feature is completely dependent on existing data, and we don’t need to add any new fields. We therefore leave the second table empty (since we aren’t adding new fields).
Next, we identify the components that we need to write or update. We don’t need to change the data definition at all, because no new fields were added. We may need to update draw-state function, since the size of the bars changes. We definitely need to write the next-state-tick function, which doesn’t yet exist. We do not need to address anything about keypresses with this feature, so next-state-key is untouched. Since next-state-tick has been added for this feature, we need to add a on-tick handler to the reactor.
Now that we’ve planned what work needs to be done (on paper), we can start thinking about the code. As always, we write examples before we write functions, so we are clear on what we are trying to do.
Come up with two example instances of PetState that illustrate what should happen as we change the sleep and hunger fields. You can see the ones we chose on the worksheet. What’s another good example for us to use in coding and testing?
In our samples, we estimate a bit from looking at the pictures, but note that we pick numbers that would work with the desired behavior — MIDPET represents the state after 25 ticks, because hunger is 50 less (decreased by 2 each tick), and sleep is 25 less (decreased by 1 on each tick). The LOSEPET sample instance corresponds to the state when both hunger and sleep values are 0.
Use your sample instances to write examples of the next-state-tick function, which we marked as a to-do item on the first page of the worksheet.
Now we need to use this information to edit the current code, checking off the boxes we identified as we go.
Look at the draw-state function: how will it need to change to draw boxes for the sleep and hunger values?
The draw-state function already does this, so we can check the draw-state changes off as being done (without doing additional work).
Develop next-state-tick, using the contract in the starter file and the examples from the worksheet.
Once we’ve finished using the design recipe to implement next-state-tick, we can check off its box. Finally, we need to add the handler to the reactor so the reactor calls the function we just wrote on tick events.
Edit the pet-react reactor to include next-state-tick alongside the on-tick handler.
You should have ended up with something like this:
pet-react = reactor:
  init: FULLPET,
  on-tick: next-state-tick,
  to-draw: draw-state
end
Make sure you get a working animation with bars that decrease before moving on, like this:

Modification 2: Key Events
Next, we’ll add key events to the game so the player can increase them so they don’t reach zero!
Turn to Animation Data Worksheet (Page 38) and Page 39 in your workbook. Fill in the first page to plan out the following extension: On a keypress, if the user pressed “f” (for “feed”), hunger should increase by 10. If the user pressed “s” (for “sleep”), sleep should increase by 5. If the user presses any other keys, nothing should change.
As you fill in the worksheet, think about useful sketches that capture this new feature, whether you need new fields, and which functions are effected.
When you’ve implemented next-state-key, you can add it to the reactor at the bottom of the file with:
pet-react = reactor:
  init: FULLPET,
  on-key: next-state-key,
  on-tick: next-state-tick,
  to-draw: draw-state
end
and test out your game!
Modification 3: Change Pet Image When Game is Lost
When any bar reaches zero, the game is lost and your pet is sad — make the picture change to show the player this! In addition, when the game is lost, the “f” and “s” keys shouldn’t do anything. Instead, the user should be able to press the “r” key (for “restart”), to reset hunger and sleep 100, and start playing again. Use the an animation-extension worksheet to plan out your changes.
Synthesize
You now know everything you need to build interactive games that react to the keyboard, draw an image, and change over time! These are the fundamentals of building up an interactive program, and there are a lot of games, simulations, or activities you can build already. For example, you could build Pong, or the extended Ninja Cat, a more involved Pet Simulator, a game with levels, and much, much more.
Some of these ideas are more straightforward than others with what you know. The rest of the workbook and units are designed to show you different features that you can add to interactive programs. You can work through them all if you like, or come up with an idea for your own program, and try the ones that will help you build your very own program!
Additional Exercises
-
Find your own images to create a different virtual pet Stop the bars from overflowing some maximum (produce something like this completed game).
-
Add an
x-coordto thePetStateso the pet moves around, either on keypress or based on clock ticks. -
Add a
costumeto thePetState, then change the draw-pet function so that it changes the costume based on the pet’s mood (if a-pet.hunger <= 50, show a picture of the pet looking hungry)
These materials were developed partly through support of the National Science Foundation,
(awards 1042210, 1535276, 1648684, and 1738598).
Bootstrap:Reactive by Emma Youndtsmith, Emmanuel Schanzer, Kathi Fisler, Shriram Krishnamurthi, Joe Politz and Dorai Sitaram
is licensed under a
Creative Commons 4.0 Unported License.
Based on a work at www.BootstrapWorld.org.
Permissions beyond the scope of this license may be available by contacting
schanzer@BootstrapWorld.org.
Refactoring
Refactoring
Beginning with a working program, students refactor the code to be more readable, and practice using drawing functions in Pyret
Prerequisites |
None |
|||||||||||||||
Product Outcomes |
|
|||||||||||||||
Materials |
||||||||||||||||
Language Table |
|
- refactor
-
the process of changing the style or structure of a program’s code, without changing the program’s behavior
Refactoring - a Case Study 40 minutes
Overview
Student are introduced to the programming concept of refactoring, which closely models the Mathematical Practice 7: Identify and make use of structure. Students create an emoji generator, and then refactor it to make the code cleaner.
Launch
One of the most common tasks software developers find themselves performing is refactoring code. This means taking code that is already working and complete, and cleaning it up: adding comments, removing unnecessary expressions, and generally making their code more readable and useable by others. Refactoring does not change the behavior of the program, only the appearance of the code. For instance, a messy expression like:
(((4 * 4) + (3 / (8 - 6))) * (9 * 9)) * (1 + 1)
could be refactored into:
((num-sqr(4) + (3 / 2)) * num-sqr(9)) * 2
Both expressions return the same value, but the second is much more readable. Refactoring can involve using existing functions (such as num-sqr in the example above) or writing new functions to perform small tasks.
Open the Robot Emoji file and press "Run". In this file, there are two versions of the same program written by different students.
Take a look at the definitions in this file, and, with your partner, discuss what you notice. Which student’s code is easiest to read and understand? Which formatting do you like better? If you were collaborating on a project with another programmer, which version of this code would you rather to receive, and why?
Discuss with students the differences in documentation, formatting, and organization of the two versions of the emoji code.
Next, we’re going to practice refactoring an existing program that draws an image.
Investigate
Open the Emoji Refactoring file and click "Run".
This code draws an image of a simple face emoji. Without changing the final image produced, can you see any opportunities to edit the code to make it more readable?
Refactor the code provided. This could include adding comments, more space betwen expressions, or simplifying the existing expressions. Once finished, write one more expression to create a smaller (emoji-sized) version of the original image.
This activity can be done individually or as a class, with students giving suggestions for refactoring code projected at the front of the room. Once the refactoring is completed, students can practice using image functions to create an emoji of their own.
These materials were developed partly through support of the National Science Foundation,
(awards 1042210, 1535276, 1648684, and 1738598).
Bootstrap:Reactive by Emma Youndtsmith, Emmanuel Schanzer, Kathi Fisler, Shriram Krishnamurthi, Joe Politz and Dorai Sitaram
is licensed under a
Creative Commons 4.0 Unported License.
Based on a work at www.BootstrapWorld.org.
Permissions beyond the scope of this license may be available by contacting
schanzer@BootstrapWorld.org.
Your Own Drawing Functions
Your Own Drawing Functions
Starting with a bare-bones reactor, students brainstorm possible animations, and write their own draw-state functions
Prerequisites |
None |
|||||||||||||||
Product Outcomes |
|
|||||||||||||||
Materials |
||||||||||||||||
Language Table |
|
Drawing with a Single Number 30 minutes
Overview
Students practice writing a simple function to draw the state of a Reactor, when that state consists of only a single number.
Launch
The majority of reactive programs you’ll write in this course will use data structures consisting of multiple pieces of data, whether that be Numbers, Strings, Images, or Booleans. However, it’s not required to have a full data structure in order to use a reactor. In fact, we can create an animation based on just a single number!
Open the Blank Single Number draw-state file and take a look at the code. Before hitting "Run", can you guess what this code will do?
include image
include reactors

# next-state-tick :: Number -> Number
fun next-state-tick(n):
  n + 1
end

# draw-state :: Number -> Image
fun draw-state(n):

  "fix me!"

end

num-react = reactor:
  init: 1,
  # to-draw: draw-state,
  on-tick: next-state-tick
end

interact(num-react)
Notice how there is no data block in this file. Both the next-state-tick and the draw-state function consume a single number, and the initial value given to the reactor is also a single number (in this case, 1.)
Click Run. What do you see?
According to the next-state-tick function, on every clock tick the state (a single number) will increase by one, which is exactly what happens. Since we didn’t tell the reactor how to draw the state (the to-draw part of the reactor is commented out), when the reactor runs we see the state of the reactor (a single number) increasing, instead of an animation.
What do you think would happen if we had a reactor with a complete draw-state function, but a next-state-tick function that never updated the state? (Consuming and producing the same value.)
Reinforce the fact that, although the draw-state and next-state-tick functions work together within a reactor to produce an animation, each function can work without the other. In this example, next-state-tick will update the state even without a function to draw the state.
There are much more interesting things we can display using a number as the state of the reactor, however!
Investigate
Change the draw-state function so that it consumes a Number and produces an image. Then, uncomment the to-draw: draw-state line in the reactor to see an animation when the program runs!
Encourage students to brainstorm and share ideas for the draw-state function before beginning. Some possible options include:
-
Drawing a star of size n (so that it gets larger on each tick)
-
Display n as an image using the text function.
-
Have students share back the draw-state functions they wrote.
Drawing with Two Numbers 30 minutes
Overview
This activity turns up the cognitive load: students practice writing a function to draw the state of a Reactor, when that state consists of a structure containing two numbers.
Launch
You’ve practiced writing a draw-state function using a single number as a state, now let’s look at something a bit more familiar.
Open the Blank 2 Number draw-state file and take a look at the code.
include image
include reactors

data AnimationState:
  | state(
      a :: Number,
      b :: Number)
end

START = state(1, 100)

# next-state-tick :: AnimationState -> AnimationState
fun next-state-tick(s):
  state(s.a + 1, s.b - 1)
end

# draw-state :: AnimationState -> Image
fun draw-state(s):

  "fix me!"

end

state-react = reactor:
  init: START,
# to-draw: draw-state,
  on-tick: next-state-tick
end

interact(state-react)
This code includes a data structure (called AnimationState) containing two numbers as its fields, a and b. As before, the draw-state function is incomplete, and commented out from the reactor.
Based on the next-state-tick function defined here, what do you think will happen when you hit ‘Run’? Discuss with your partner, then try it out!
With only the next-state-tick function, we can see the state updating, increasing the first number by 1 and decreasing the second number by 1 each tick.
Investigate
How could you define a draw-state function to show something interesting when the program runs? Branstorm with your partner, then change the existing, broken draw-state function to consume an AnimationState and produce an image. Then, comment out the to-draw: draw-state line in the reactor to see an animation when the program runs!
Some possible ideas for this activity:
-
Display two shapes of size a and b, which get larger and smaller, respectively, as the reactor runs.
-
Make a and b the coordinates of an image, moving down and to the right across a background as the reactor runs.
Synthesize
Have students share back what they brainstormed before beginning, then share the completed draw-state functions they wrote, and the animations they created!
These materials were developed partly through support of the National Science Foundation,
(awards 1042210, 1535276, 1648684, and 1738598).
Bootstrap:Reactive by Emma Youndtsmith, Emmanuel Schanzer, Kathi Fisler, Shriram Krishnamurthi, Joe Politz and Dorai Sitaram
is licensed under a
Creative Commons 4.0 Unported License.
Based on a work at www.BootstrapWorld.org.
Permissions beyond the scope of this license may be available by contacting
schanzer@BootstrapWorld.org.
Build Your Own Animation
Build Your Own Animation
Students create a game of their own design using what they have learned so far.
Prerequisites |
None |
|||||||||||||||
Product Outcomes |
|
|||||||||||||||
Materials |
|
|||||||||||||||
Language Table |
|
- instance
-
a specific, packaged value of a data structure that contains other values in its fields
Build Your Own Animation 55 minutes
Overview
Students apply the Animation Design worksheet to their own, creative animations.
Launch
You’ve now learned the core tasks that go into building an animation:
-
Draw some sketches to illustrate your animation
-
Analyze the game elements to identify the information that changes across frames
-
Create a data structure to capture those elements
-
Write
draw-stateand one or both ofnext-state-tickandnext-state-key -
Create a reactor to pull it all together
In this lesson, we show you how to use our Animation Design Worksheet to keep track of these steps as you build your own animation.
Brainstorm an animation or game that you would like to build. Don’t make it too complicated. Start with no more than 4 pieces of changing information.
As we saw in the previous unit, we can always go back and add more elements or details to an existing animation. So keep it simple to get a basic game running, then you can add more later.
Turn the Animation Design Worksheet on Page 41 in your workbook.
Fill in three sketches from your animation. Discuss with your partner whether the sketches you chose have highlighted interesting aspects of your game.
The tables below the animation sketches ask you to identify the elements in your game.
Fill in the first table, noting the elements that are changing and how they are changing. If you have more things changing than there are rows, consider making a simpler animation first then extending (at the end of the lesson).
Have your partner or a classmate check your work — make sure you both agree that you’ve identified everything that is changing.
Fill in the second table, figuring out datatypes that capture each piece of information that is changing in your animation. Talk with someone to check your work (and help check the work of others).
The table at the bottom of the worksheet asks you to make a to-do list of which functions and components you will need to write to build your animation.
Mark off which components and functions you expect to need. Think about whether your animation updates on ticks, key presses, or both.
Students should have ended up checking "sample instances", draw-state, and "reactor", plus one or both of next-state-tick and next-state-key. Sample instances get created anytime you have to create a data structure, and every animation or game has an underlying data structure.
Go to the top of the second page of the worksheet.
Investigate
Define a data structure for your game state, with one field for each piece of changing information that you identified in the table of the middle of page 1 of the worksheet. The name of your data structure is up to you, but should reflect the theme of your game (like RocketState, SoccerState, OceanState, etc)
Is your data structure defined?
Write down the sample instances of your data structure for each sketch that you drew at the top of the first page of the worksheet.
At this point, you could open a new Pyret file and type in your data structure and your sample instances. This would help you check whether your instances and data block are consistent with each other. If you don’t have access to the computer right now, you can come back and do this step later.
Sanity-checking each bit of code and examples as you go helps students catch errors early. So typing their work so far in now makes sense, if your class set up allows it.
Now you have to develop whichever functions you marked off on the todo-list on the bottom of page 1 of the worksheet.
Pick one of the functions you need to develop. Follow the design recipe, including working out examples, as you develop each function. Finish and test each function before moving onto the next one.
There are extra design-recipe worksheets in the back of the workbook if you need them to help you remember the steps (domain and range, examples, function, and typing and testing your function).
You need to decide how much scaffolding and help your students need at this point. You can feel free to let them work on their own, or you can encourage them to work through design-recipe worksheets if they still need the structure that those provide. The main goal is to have students tackle only one function at a time, and to make sure it is working before they go on to the other functions.
Finally, we can build and run the animation by defining a reactor.
Add a reactor to your file, then interact with it to run your animation!
Remember that a reactor looks like:
??? = reactor:
  init: ???,
  on-key: next-state-key,
  on-tick: next-state-tick,
  to-draw: draw-state
end
where you replace the ??? with names and instances that correspond to your game.
Closing
Congratulations! You have created your own animation from scratch. If there are features you want to add, use the extra Animation Extension Worksheets from the back of the workbook to help plan and manage your changes. If you build up an animation one piece at a time, you can get to a fairly complex game in a manageable way.
These materials were developed partly through support of the National Science Foundation,
(awards 1042210, 1535276, 1648684, and 1738598).
Bootstrap:Reactive by Emma Youndtsmith, Emmanuel Schanzer, Kathi Fisler, Shriram Krishnamurthi, Joe Politz and Dorai Sitaram
is licensed under a
Creative Commons 4.0 Unported License.
Based on a work at www.BootstrapWorld.org.
Permissions beyond the scope of this license may be available by contacting
schanzer@BootstrapWorld.org.
Adding Collisions
Adding Collisions
Using what they know from Bootstrap:Algebra, students write a distance function and collision detection function to handle collisions in their games, this time using the Data Structures and Reactor from their games.
Prerequisites |
None |
|||||||||||||||
Product Outcomes |
|
|||||||||||||||
Materials |
|
|||||||||||||||
Language Table |
|
- helper function
-
a small function that handles a specific part of another computation, and gets called from other functions
- hypotenuse
-
the side opposite the 90-degree angle in a right triangle
The Distance Formula 30 minutes
Overview
Students implement the distance formula, to prepare for collision detection in their games.
Launch
So far, none of the animations we’ve created included any distance or collision-detection functions. However, if you want to make a game where the player has to hit a target, avoid an enemy, jump onto platforms, or reach a specific part of the screen, we’ll need to account for collisions. This is going to require a little math, but luckily it’s exactly the same as it was in Bootstrap:Algebra.
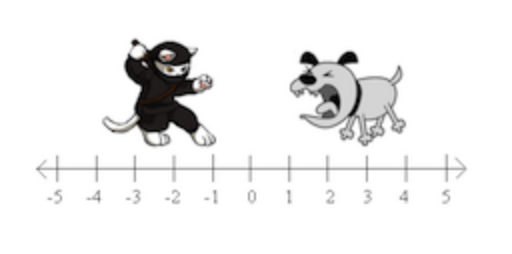
image
-
In the image above, how far apart are the cat and dog?
-
If the cat was moved one space to the right, how far apart would they be?
-
What if the cat and dog switched positions?
Finding the distance in one dimesion is pretty easy: if the characters are on the same number line, we subtract the smaller coordinate from the larger one, and we have our distance.
When the cat and dog were switched, did you still subtract the dog’s position from the cat’s, or subtract the cat’s position from the dog’s? Why?
Unfortunately, most distances aren’t only measured in one dimension. We’ll need some code to calculate the distance between two points in two dimensions.
Investigate
-
How could you find the distance between the two points shown in this image?
-
How could you find the length of the C, also called the Hypotenuse?
Let’s start with what we do know: if we treat the x- and y-intercepts of C as lines A and B, we have a right triangle.
What is the line-length of A? Would it be different if the triangle pointed downward, and intercepted the point (0, −4)?
Ancient civilizations had the same problem: they also struggled to find the distance between points in two dimensions. Let’s work through a way to think about this problem: what expression computes the length of the hypotenuse of a right triangle?
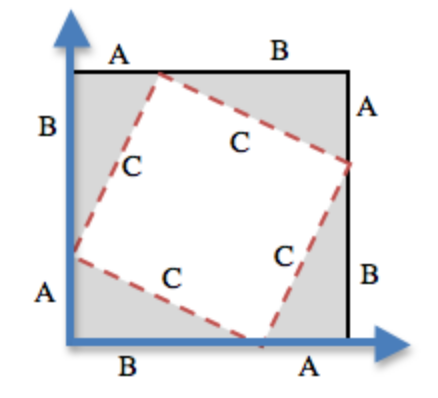
For any right triangle, it is possible to draw a picture where the hypotenuse is used for all four sides of a square. In the diagram shown here, the white square is surrounded by four gray, identical right-triangles, each with sides A and B. The square itself has four identical sides of length C, which are the hypotenuses for the triangles. If the area of a square is expressed by side ∗ side, then the area of the white space is C^2.
By moving the gray triangles, it is possible to create two rectangles that fit inside the original square. While the space taken up by the triangles has shifted, it hasn’t gotten any bigger or smaller. Likewise, the white space has been broken into two smaller squares, but in total it remains the same size. By using the side-lengths A and B, one can calculate the area of the two squares.
What is the area of the smaller square? The larger square?
image
The smaller square has an area of A^2, and the larger square has an area of B^2. Since these squares are just the original square broken up into two pieces, we know that the sum of these areas must be equal to the area of the original square:
A^2 + B^2 = C^2
Does the same equation work for any values of A and B?
To get C by itself, we take the square-root of the sum of the areas:
√( A^2 + B^2 ) = C
Pythagoras proved that you can get the square of the hypotenuse by adding the squares of the other two sides. In your games, you’re going to use the horizontal and vertical distance between two characters as the two sides of your triangle, and use the Pythagorean theorem to find the length of that third side.
Remind students that A and B are the horizontal and vertical lengths, which are calculated by line-length.
-
Turn to Page 45 of your workbook - you’ll see the formula written out.
-
Draw out the circle of evaluation, starting with the simplest expression you can see first.
-
Once you have the circle of evaluation, translate it into Pyret code at the bottom of the page, starting with
check:
  distance(4, 2, 0, 5) is...
end
Now you’ve got code that tells you the distance between the points (4, 2) and (0, 5). But we want to have it work for any two points. It would be great if we had a function that would just take the x’s and y’s as input, and do the math for us.
-
Turn to Page 46, and read the problem statement and function header carefully.
-
Use the Design Recipe to write your distance function. Feel free to use the work from the previous page as your first example, and then come up with a new one of your own.
-
When finished, type your
distancefunctions into your game, and see what happens. -
Does anything happen when things run into each other?
You still need a function to check whether or not two things are colliding.
Watch Out! Pay careful attention to the order in which the coordinates are given to the distance function. The player’s x-coordinate (px) must be given first, followed by the player’s y (py), character’s x (cx), and character’s y (cy). Just like with making data structures, order matters, and the distance function will not work otherwise. Also be sure to check that students are using num-sqr and num-sqrt in the correct places. |
Collision Detection 30 minutes
Overview
Students implement a simple Boolean-producing function, which composes with the distance function they implemented.
Launch
So what do we want to do with this distance?
How close should your danger and your player be, before they hit each other?
At the top of Page 47 you’ll find the Word Problem for is-collision.
-
Fill in the Contract, two examples, and then write the code. Remember: you WILL need to make use of the
distancefunction you just wrote! -
When you’re done, type it into your game, underneath
distance.
Now that you have a function which will check whether two things are colliding, you can use it in your game! For extra practice, You can also implement collision detection into this Pyret Ninja Cat game. This is the program we’ll be altering for this lesson, as an example. In Ninja Cat, when the cat collides with the dog, we want to put the dog offscreen so that he can come back to attack again.
Investigate
Out of the major functions in the game (next-state-tick, draw-state, or next-state-key), which do you think you’ll need to edit to handle collisions, changing the GameState when two characters collide?
We’ll need to make some more if branches for next-state-tick.
-
Start with the test: how could you check whether the cat and dog are colliding? Have you written a function to check that?
-
What do the inputs need to be?
-
How do you get the
playeryout of theGameState?playerx? -
How do you get the
dangerxout of theGameState?dangery?
if is-collision(
  g.playerx,
  g.playery,
  g.dangerx,
  g.dangery):   ...result...
Remember that next-state-tick produces a GameState, so what function should come first in our result?
if is-collision(
  g.playerx,
  g.playery,
  g.dangerx,
  g.dangery):
game(
  ...playerx...,
  ...playery...,
  ...dangerx...,
  ...dangery...,
  ...dangerspeed...
  ...targetx...
  ...targety...
  ...targetspeed...)
And what should happen when the cat and dog collide? Can you think of a number that puts the dog off the screen on the left side? What about the dog’s y-coordinate? We could choose a number and always place it at the same y-coordinate each time, but then the game would be really easy! To make it more challenging, we’d like the dog to appear at a random y-coordinate each time it collides with the cat. Thankfully, Pyret has a function which produces a random number between zero and its input:
# num-random :: Number -> Number
if is-collision(
  g.playerx,
  g.playery,
  g.dangerx,
  g.dangery):
game(
  g.playerx,
  200,
  num-random(480),
  0,
  0,
  g.targetx,
  g.targety,
  g.targetspeed)
Collision detection must be part of the next-state-tick function because the game should be checking for a collision each time the GameState is updated, on every tick. Students may assume that draw-state should handle collision detection, but point out that the Range of draw-state is an Image, and their function must return a new GameState in order to set the locations of the characters after a collision.
Once you’ve finished, write another branch to check whether the player and the target have collided. Challenges:
-
Change your first condition so that the danger gets reset only when the player and danger collide AND the cat is jumping. (What must be true about the player’s y-coordinate for it to be jumping?)
-
Add another condition to check whether the player has collided with the danger while the player is on the ground. This could be a single expression within
next-state-tick, or you can write a helper function calledgame-overto do this work, and use it in other functions as well (maybe the GameState is drawn differently once the game is over.)
These materials were developed partly through support of the National Science Foundation,
(awards 1042210, 1535276, 1648684, and 1738598).
Bootstrap:Reactive by Emma Youndtsmith, Emmanuel Schanzer, Kathi Fisler, Shriram Krishnamurthi, Joe Politz and Dorai Sitaram
is licensed under a
Creative Commons 4.0 Unported License.
Based on a work at www.BootstrapWorld.org.
Permissions beyond the scope of this license may be available by contacting
schanzer@BootstrapWorld.org.
Scoring
Scoring
Students extend their State structure to include a score, then modify their game code to change and display that score.
Prerequisites |
None |
|||||||||||||||
Product Outcomes |
|
|||||||||||||||
Materials |
||||||||||||||||
Language Table |
|
- helper function
-
a small function that handles a specific part of another computation, and gets called from other functions
Adding a Scoring System 45 minutes
Overview
Students add a score to their game.
Launch
The score is something that will be changing in the game, so you can be sure that it has to be added to the ____State data structure. In our example Ninja Cat program, we’ve called our structure GameState, which currently contains the x and y-coordinates for our player, danger, and target, plus the speed of the danger, and speed of the target. Your game(s) will likely have different structures.
Investigate
-
What data type is a score? Number, String, Image, or Boolean?
-
What would be the score in your starting game state? (we called this
STARTin our game.) -
Change the data structure in your game so it includes a score.
Remember: Since your structure is changing, you now have to go through your game code — every time you call the constructor function for your structure (ours is game()), the score must be included. It may be helpful to add the score as the very first or last field of the structure, to make this easier.
How would you get the score out of one of your instances?
The GameState structure for our Ninja Cat game now looks like this:
data GameState:
    game(
      playerx :: Number,
      playery :: Number,
      dangerx :: Number,
      dangery :: Number,
      dangerspeed :: Number,
      targetx :: Number,
      targety :: Number,
      targetspeed :: Number,
      score :: Number)
end
Reminder Your students will likely have radically different games at this point in the course. This lesson is not meant to be followed exactly, but rather used to give students an idea of what steps they should take to add a scoring system to their own games. For extra practice, students can work through adding a scoring system to the Ninja Cat program as well as their own games. |
Now that the game has a score, that score needs to actually increase or decrease depending on what happens in the game. For our Ninja Cat game, we’ll say that the score should go up by 30 points when Ninja Cat collides with the ruby (target), and down by 20 points when she collides with the dog (danger).
-
Which of the
ifbranches in yournext-state-tickfunction checks whether your player has collided with another character? -
How would you decrease the game’s
scoreby 20 points if the player collides with the danger? -
Hint: How many dangers does your game have? If there are multiple things your player could hit to lose points, remember to check for each possible collision condition!
If you completed the optional challenge at the end of the Collisions Feature to write the function game-over, you already have your own helper function to check whether or not your game over condition is met. That will be the first condition inside next-state-tick, since we don’t want the game to continue if it’s already over! (In our Ninja Cat game, game-over returns true if the cat collides with the dog, AND the cat is on the ground.) After checking whether or not the game is over, the next three conditions in our next-state-tick function check whether the player has collided with the danger and target, as well as whether the player is jumping on the danger:
# next-state-tick :: GameState -> GameState
fun next-state-tick(g):
  if game-over(g): g
  # if player and danger collide while player is on the ground,
  #reset player and danger and decrease score
  else if is-collision(g.playerx, g.playery, g.dangerx, g.dangery)
    and (g.playery < 110):
    game(
      START.playerx,
      START.playery,
      750,
      g.dangery,
      g.dangerspeed,
      g.targetx,
      g.targety,
      g.targetspeed,
      g.score - 20)
    # if player and danger collide while player is jumping,
    # reset danger and increase score
  else if is-collision(g.playerx, g.playery, g.dangerx, g.dangery)
    and (g.playery > 110) and (g.playery < 300):
    game(
      g.playerx,
      200,
      -100,
      0,
      0,
      g.targetx,
      g.targety,
      g.targetspeed,
      g.score + 30)
  # if player and target collide, reset target and increase score
  else if is-collision(g.playerx, g.playery, g.targetx, g.targety):
    game(
      g.playerx,
      g.playery,
      g.dangerx,
      g.dangery,
      g.dangerspeed,
      -400,
      0,
      0,
      g.score + 30)
Change your own game code so that your score increases and decreases depending on various game conditions: Maybe your score increases when the player collides with a target, reaches a specific area of the screen, or reaches a specific area only after picking up an item. Maybe your game’s scoring system isn’t a seprate score at all, but a timer that increases every tick, and represents how long someone has been playing your game. There are lots of ways to implement a scoring system, and which one you choose will depend on the specific mechanics of your individual game.
Now your scoring system is in place, but how will the person playing your game know what their score is? You’ll want to display the score on the screen.
Which function handles how the game state is drawn?
In the draw-state function, images are placed onto the background using put-image to draw the game. But the score is represented by a Number: we need a way to represent it as an Image. Thankfully, Pyret has some built-in functions that can help with this: the function num-to-string takes in a Number for its domain and returns a String representation of that number. This string can then be passed to the text function to return an Image that can be used in draw-state.
Copy the following contracts into your workbook:
-
# num-to-string :: Number -> String -
# text :: String, Number, String -> Image -
How would you use the
num-to-stringandtextfunctions together to draw the score into the game? -
How do you get the
scoreout of the game state? -
How large should the text of the score be? Where should it be placed on your game scene?
The expression:
put-image(text(num-to-string(g.score), 20, "white"), 320, 240, BACKGROUND-IMG)
will place the score (drawn in size 20 white text) onto the center of the BACKGROUND-IMG.
Use these functions to draw the score onto your game screen. You could also use the string-append function to make it clear to players that the number they see is their score, like so:
text(string-append("Score: ", num-to-string(g.score)), 20, "white")
These materials were developed partly through support of the National Science Foundation,
(awards 1042210, 1535276, 1648684, and 1738598).
Bootstrap:Reactive by Emma Youndtsmith, Emmanuel Schanzer, Kathi Fisler, Shriram Krishnamurthi, Joe Politz and Dorai Sitaram
is licensed under a
Creative Commons 4.0 Unported License.
Based on a work at www.BootstrapWorld.org.
Permissions beyond the scope of this license may be available by contacting
schanzer@BootstrapWorld.org.
Adding Levels
Adding Levels
Students parameterize other parts of their game, so that the experience changes as the score increases. This track delves deeper into conditionals and abstraction, offering students a chance to customize their games further while applying those concepts.
Prerequisites |
None |
|||||||||||||||
Product Outcomes |
|
|||||||||||||||
Materials |
||||||||||||||||
Language Table |
|
- helper function
-
a small function that handles a specific part of another computation, and gets called from other functions
Adding Levels 45 minutes
Overview
This activity introduces a programming pattern to add levels to students' games. For now, the only thing a level does is change the background - but students can easily extend this to change other aspects of the game.
Launch
You can add depth to your game by adding levels. In this lesson, we’ll cover making new levels based on the game’s score. To start, we want our Ninja Cat game to have a different background image when the player progresses to the next level. We’ll say that the player reaches level two when his or her score is greater than 250.
Where do you define the BACKGROUND-IMG image in your game? Keep your original background for the first level, but define a new variable, BACKGROUND2-IMG, that will be used for level 2. For the best results, use an image that is the same size as your original background.
Once you have your second background image, it should be drawn into the game — but only when a certain condition is met. Think back to the helper function we wrote to change the color of the sunset animation in Unit 4, and we need to do the same thing here!
-
What must be true for the player to progress to level 2?
-
Write a function draw-bg, which consumes the score and produces the appropriate background image.
Now that we have our helper function, we can use it to draw of that one part of the animation. Instead of blindly putting BACKGROUND-IMG into our function, now we’ll use draw-bg(g.score):
fun draw-state(g):
put-image(text(
string-append("NinjaCat! Score: ", num-to-string(g.score)),
          20, "white"),
    310, 470,
    put-image(
    text("Use arrow keys to move. Jump on the dog & catch the ruby!",
          12, "white"),
      320, 450,
      put-image(PLAYER-IMG, g.playerx, g.playery,
        put-image(CLOUD-IMG, 150, 350,
          put-image(RUBY-IMG, g.targetx, g.targety,
            put-image(DOG-IMG, g.dangerx, g.dangery,
              draw-bg(g.score)))))))
...
Investigate
Now our Ninja Cat game has a level 2! You can add more conditions to draw-bg to have multiple levels. You can use this same technique in lots of ways:
-
Write
draw-playerand changedraw-stateso that have the Player transform if the score is above 250. -
Change your animation functions so that your characters move faster if the score is above 250.
-
Add a special key (jumping? firing? warping?) that is only unlocked if the score is above 250.
These materials were developed partly through support of the National Science Foundation,
(awards 1042210, 1535276, 1648684, and 1738598).
Bootstrap:Reactive by Emma Youndtsmith, Emmanuel Schanzer, Kathi Fisler, Shriram Krishnamurthi, Joe Politz and Dorai Sitaram
is licensed under a
Creative Commons 4.0 Unported License.
Based on a work at www.BootstrapWorld.org.
Permissions beyond the scope of this license may be available by contacting
schanzer@BootstrapWorld.org.
Making Pong
Making Pong
Students use the Animation Design Worksheet to decompose a 2-player game of Pong, and implement it in Pyret.
Prerequisites |
None |
|||||||||||||||
Product Outcomes |
|
|||||||||||||||
Materials |
|
|||||||||||||||
Language Table |
|
|||||||||||||||
Preparation |
Setting up the Paddles 45 minutes
Overview
Students decompose a complex problem (implementing Pong) into simpler sub-problems, and implement the paddle portion of the game.
Launch
In Unit 3, you practiced decomposing simple animations into their data structures and functions. Let’s consider how a 2-player game of Pong works: There are two "players", each represented by a paddle on either side of the screen. Each paddle can move up and down, as long as they remain on the screen. There is also a ping-pong ball, which moves at any angle and can be on or off the screen. Let’s start out by adding the paddles, making sure they can move up and down, and then we’ll add the ball later.
Using a blank Animation Design Worksheet, figure out how the paddles behave throughout the game, and decide what Data Structure you’ll need to represent those behaviors.
Students should realize that each paddle is simply a y-coordinate, since neither paddle can ever move left or right.
Here is one possible structure that we could use to model the two players:
# a PongState has the y-coordinate
# of paddle1 and paddle2
# (no x-coordinate needed, since
# the paddles only go up/down!)
data pongState:
 | pong(
     paddle1Y :: Number,
     paddle2Y :: Number)
end
We can imagine a few sample PongState instances, in which the paddles are at different locations on the screen. If you haven’t already, it would be a good idea to define a sample state for when the game starts, and maybe two other states where the paddles are at other locations.
We’ll need to answer some questions, in order to write our draw-state function.
-
What will the paddles look like?
-
What does the background look like?
-
How wide is the background? How tall is it?
-
Define the function draw-state, and try drawing your sample PongState instances to make sure they look the way you expect them to.
The paddles don’t move on their own, so right now there’s no next-state-tick function. However, they DO move when a user hits a key! That means we’ll need to define next-state-key, and answer a few questions in the process:
Investigate
-
What key makes
paddle1Yincrease? Decrease? -
What key makes
paddle2Yincrease? Decrease? -
How much does each paddle move when it goes up or down?
-
What happens if some other key is pressed?
-
Use the Design Recipe to write the code for
next-state-key
Have students discuss their answers to these questions, before moving on to next-state-key.
At this point, we know how to change the PongState in response to a keypress and how to draw that PongState as an image. Let’s build a reactor, which uses a PongState instance as the starting state and hooks up these functions to the on-key and to-draw event handlers.
pong-react = reactor:
  init: pongState(200, 200),
  on-key: next-state-key,
  to-draw: draw-state
end
When you run this reactor with interact(pong-react), you should see your initial instance drawn on the screen, and the paddle positions should change based on the keys you press! Do all four keys do what you expect them to do? What happens if you hit some other key?
Right now, what happens if you keep moving one of the paddles up or down? Will it go off the edge of the screen? We should prevent that!
Take a few minutes and discuss with your partner: what needs to change to stop the paddles from going offscreen? You can use an Animation Design Worksheet if you want to be precise. Once you have a strategy that you feel confident about, take 15 minutes to try it out!
Synthesize
Give the class 2-3 minutes to discuss, and then have different teams share back before they start to implement.
Adding the Ball 45 minutes
Overview
Students modify the game State to add a ball, which can move in two dimensions.
Launch
Now that we’ve got our paddles set up, it’s time to start thinking about the ball. What do you notice about the ball? Have students volunteer lots of observations, and write them on the board. Only add the questions below to spark discussion if students run out of ideas:
-
When does the ball move? On its own, or only when a key is pressed?
-
Does the ball’s position change? If so, by how much?
-
What do we need, to keep track of the ball’s position?
-
Does the ball’s direction change?
-
What do we need, to keep track of the ball’s direction?
-
When does the ball’s direction change?
Investigate
Use an Animation Design Worksheet to add one part of the ball’s behavior to your game.
- Did your
PongStatechange as a result? Chances are, you needed to add `ballX -
Number` and
ballY :: Numberfields to your State, to make sure the ball could move in any direction. Did yourdraw-statefunction need to change? What aboutnext-state-key? Did you need to writenext-state-tick? If so, what did you do?
Some students will hard-code numbers for moving the ball. That’s okay! Once they start thinking about changing direction, those numbers will have to become fields in pongState, which change in response to paddle collisions.
Now the game is starting to come together! We’ve got two paddles moving up and down, and we make sure they stay on the screen. Meanwhile, we have a ball that can move in any direction…but so far the ball doesn’t know how to bounce! It’s time to plan out what bouncing will look like, and wire it all together.
-
How do you know when the ball has hit the top or bottom wall of the screen?
-
Write
is-on-wall, using the Design Recipe to help you.
The goal of this activity is to have students get their collision-detection working, in preparation for the bouncing behavior.
-
When a ball is moving up and to the right, what is happening to ballX and ballY?
-
When that ball hits a wall, what should happen?
-
How does the ball’s direction change after it hits a wall?
-
After it’s changed direction, how does the ball’s position change?
-
Use the Animation Design Worksheet to plan out the bouncing behavior
Watch out! This activity is pretty sophisticated! You’ll want to make sure there are plenty of visual scaffolds for students, or (even better!) have them generate these diagrams themselves. |
By now, you may have noticed that the direction of the ball itself needs to change, which means it needs to be added to our PongState structure. There are lots of different ways we could represent direction: it could be a String (e.g. “north”, “southeast”, “west”, etc), or it could be a pair of Numbers that represent how much the ball is moving in the x- and y-direction from frame to frame.
What other ways could you represent direction? What are the pros and cons of each representation?
Here is one example of a way to represent this, during Numbers to keep track of direction:
# a PongState has the y-coordinates
# of paddle1 and paddle2,
# x and y-coordinates of the ball,
# and x and y-coordinates
# representing the direction of the ball
data pongState:
 | pong(
     paddle1Y :: Number,
     paddle2Y :: Number,
     ballX    :: Number,
     ballY    :: Number,
     moveX    :: Number,
     moveY    :: Number)
end
When the game begins, we can start out with moveX and moveY being specific numbers that move the ball up and to the right. We can change these later, or even make them randomized every time the game starts!
Before we worry about the paddles, let’s start by thinking about the top and bottom walls of the game screen.
-
What should happen if the ball hits the top of bottom of the screen?
-
How would you detect a collision with the top or bottom wall?
-
Make the ball bounce off the top and bottom, using the Animation Design Worksheet and the Design Recipe to help you if you get stuck!
Now let’s make some sample instances for when the game begins, when the ball is about to hit a paddle, and then immediately after:
# an instance where the paddles are
# at the starting position,
# the ball is in the center (300, 200),
# and moving to the right by 20
# and up by 10 on each tick
pongStateA = pong(200, 200, 300, 200, 20, 10)

# an instance where the ball (x=150, y=280)
# is about to hit the top wall
pongStateB = pong(200, 300, 150, 280, 20, 10)

# an instance after the ball (x=550, y=280)
# hits the top wall
# it's still moving right (20),
# but now it's moving down instead of up (-10)
pongStateC = pong(200, 300, 550, 320, 20, -10)
The ball starts out moving up and to the right, but once it hits a wall the direction needs to change. Instead of moving up (adding 10 each tick), it’s now moving down (adding -10 each tick) after bouncing off the wall (it’s still moving up the screen by 10 each time, so we leave that unchanged). Note: Once the ball hits the wall, its y-position needs to change! If the ball stays where it is, it will still be considered to have "hit" the wall on the next tick. This will cause the ball to jitter back and forth, as it constantly hits the same wall over and over.
Change next-state-tick so that it generates the next PongState using the ball’s previous position and the move fields. Then, add conditionals to next-state-tick so that it will change the direction of the ball when it’s hit a walll
Let’s walk through our new next-state-tick function, and make sure we understand it:
# next-state-tick :: pongState -> pongState
# move the ball, based on direction fields
fun next-state-tick(w):
  if (is-on-wall(w)):
    pong(
      w.paddle1Y,
      w.paddle2Y,
      # the paddles don't change position
      w.ballX + w.moveX,
      # the ball keeps moving in the same x-direction
      w.ballY + (w.moveY * -1),
      # but it bounces off the wall (move backwards by moveY)
      w.moveX,
      # the x-direction stays the same
      w.moveY * -1)
      # and the y-direction is reversed
  else:
    pong(
      w.paddle1Y,
      w.paddle2Y,
      w.ballX + w.moveX,
      w.ballY + w.moveY,
      w.moveX,
      w.moveY)
  end
end
If a collision with an upper or lower wall occurs, we need to do two things. First, we need to move the ball to it’s next position, and make sure that new position is far enough away from the paddle so that it won’t be considered another collision. Second, we need to flip the y-direction so that the ball is moving in the opposite direction. This is easy to do, by multiplying the moveY by −1.
Now it’s time to start thinking about a different kind of collision: what happens when the ball hits a paddle?
-
How do you know when the ball has hit
paddle1?paddle2? -
Write
hit-paddle1andhit-paddle2, using the Design Recipe to help you. -
Change
next-state-tickso it checks for a paddle collision in addition to the wall collision.
Closing 5 minutes
You’ve got the beginnings of a very nice Pong game! What are some features you might want to add?
Let students brainstorm ideas. Some suggestions: keeping score, a game-over event, a splash screen…
These materials were developed partly through support of the National Science Foundation,
(awards 1042210, 1535276, 1648684, and 1738598).
Bootstrap:Reactive by Emma Youndtsmith, Emmanuel Schanzer, Kathi Fisler, Shriram Krishnamurthi, Joe Politz and Dorai Sitaram
is licensed under a
Creative Commons 4.0 Unported License.
Based on a work at www.BootstrapWorld.org.
Permissions beyond the scope of this license may be available by contacting
schanzer@BootstrapWorld.org.
Going Deeper: Nested Structures
Going Deeper: Nested Structures
Students refactor code from a simple animation to include structures within structures, and see how to use nested structures in their own games and animations to manage complexity.
Prerequisites |
None |
|||||||||||||||
Product Outcomes |
|
|||||||||||||||
Materials |
||||||||||||||||
Language Table |
|
|||||||||||||||
Preparation |
|
- helper function
-
a small function that handles a specific part of another computation, and gets called from other functions
Nested Structures: Managing Complexity 45 minutes
Overview
Students are introduced to the need for nested data structures, as a way of managing complexity.
Launch
Now that you know all about data structures, you’re able to use them to make video games and animations from scratch, including games that are much more complex than those you worked on in Bootstrap:Algebra. However, as you add more things to your game, you quickly end up with a large number of elements in your data structure. (If you have multiple characters in your game, each with their own position, speed, costume, etc. that all change, your structure can become quite long and unwieldy.)
Making changes to your structure, or writing functions to alter it, can get extremely complex. One way to manage this complexity is to use nested structures: Just like we can write functions to handle repetitive processes, we can make structures to handle repetitive data. For example, if each of our 4 game characters have their own x and y coordinates, we could make one Position structure to use for each character. Then, instead of our game structure containing 8 numbers, it only contains 4 Positions.
Let’s start out with a small animation to explore the benefits of nested structures. Open the Pinwheels Starter #1 file in Pyret, and click "Run". We see four colorful pinwheels spinning in the breeze. Now, take a look at the code:
# A PinwheelState is the angle of rotation for 4 pinwheels
data PinwheelState:
  | pinwheel(
      p1a :: Number,
      p2a :: Number,
      p3a :: Number,
      p4a :: Number)
end

STARTING-PINWHEELS = pinwheel(60, 3, 25, 70)
The only things that change in this animation are the angles of rotaton for each of the 4 pinwheels, and each of those numbers are included in the PinwheelState data structure. As usual, we have a next-state-tick function to handle updating the state of the animation, and a draw-state function to draw the animation. We also have two helper functions to do some of the work for these main functions: update-pinwheel, which increases the angle for an individual pinwheel, and draw-pinwheel, which rotates the pinwheel image by the given angle. We’ll talk about helper functions in greater detail later, but for now, notice that because we’ve delegated most of the heavy lifting to these helpers, our next-state-tick function only needs to make a new PinwheelState by calling on update-pinwheel to increase the angle of rotation for each number in the structure. Most of the actual work in this function is done by update-pinwheel.
Suppose we wanted each of the pinwheels to spin at a different speed. We already know that any changeable part of the animation will need to be added to the structure, so we’ll need to add 4 new numbers to the PinwheelState structure.
Investigate
Print out the following link: code screenshot from the pinwheels file and underline or highlight each spot in the code you would need to change in order to add a speed to each pinwheel. Once you’ve identified which sections of the code will need to change, edit the program on the computer so that each pinwheel spins at a different speed.
Now we have a nice animation of pinwheels spinning at different speeds, but what if we had started off by making each individual pinwheel its own structure? As we’ll see shortly, this can help save us some time and headaches down the road, if we want to add to our animation later.
Open the Pinwheels Starter #2 file on your computer and take a look at the code. What differences do you see between this starter file and the first?
This animation looks exactly the same, but the data structure and the code is slightly different. This time, the PinwheelState data structure contains four Pinwheels, each their own structure, instead of four numbers. The angle of rotation is now contained inside the Pinwheel structure:
# A Pinwheel is an angle of rotation
data Pinwheel:
  | pw(angle :: Number)
end

# A PinwheelState is 4 Pinwheels
data PinwheelState:
  | pinwheels(
      p1 :: Pinwheel,
      p2 :: Pinwheel,
      p3 :: Pinwheel,
      p4 :: Pinwheel)
end

STARTING-PINWHEELS = pinwheels(pw(60), pw(3), pw(25), pw(70))
-
How would you get
pw1out of theSTARTING-PINWHEELSinstance? -
How would you get the angle out of
pw2in theSTARTING-PINWHEELSinstance?
With nested structures, accessing fields in the "child" structure (in this case, Pinwheel requires two dots. So, STARTING-PINWHEELS.pw1 produces pw(60), the first Pinwheel. Whereas STARTING-PINWHEELS.pw2.angle produces 3, the angle of pw2.
Another change between the non-nested and nested versions of the code is that in the nested version, our helper functions update-pinwheel and draw-pinwheel now take in a Pinwheel data structure, as opposed to just a number. The animation still works and looks the same on the outside, and the code hasn’t changed too drastically.
Let’s do the same activity for the nested version of the code, where we make each pinwheel spin at a different speed.
Print out the following code screenshot for the nested pinwheels file, and underline or highlight each spot in the code you would need to change in order to change each pinwheel’s speed independently. Once you’ve identified which sections will need to change, edit the nested version of the program on the computer.
Point out the differences in underlining between the two code screenshots. Note that when students finish this activity, both of the animations will look the same- but one program will have been much more straightforward to modify! We wrote a bit more code at the beginning to set up the nested structures, but that paid off later by giving us more flexibility to change the behavior of the pinwheels.
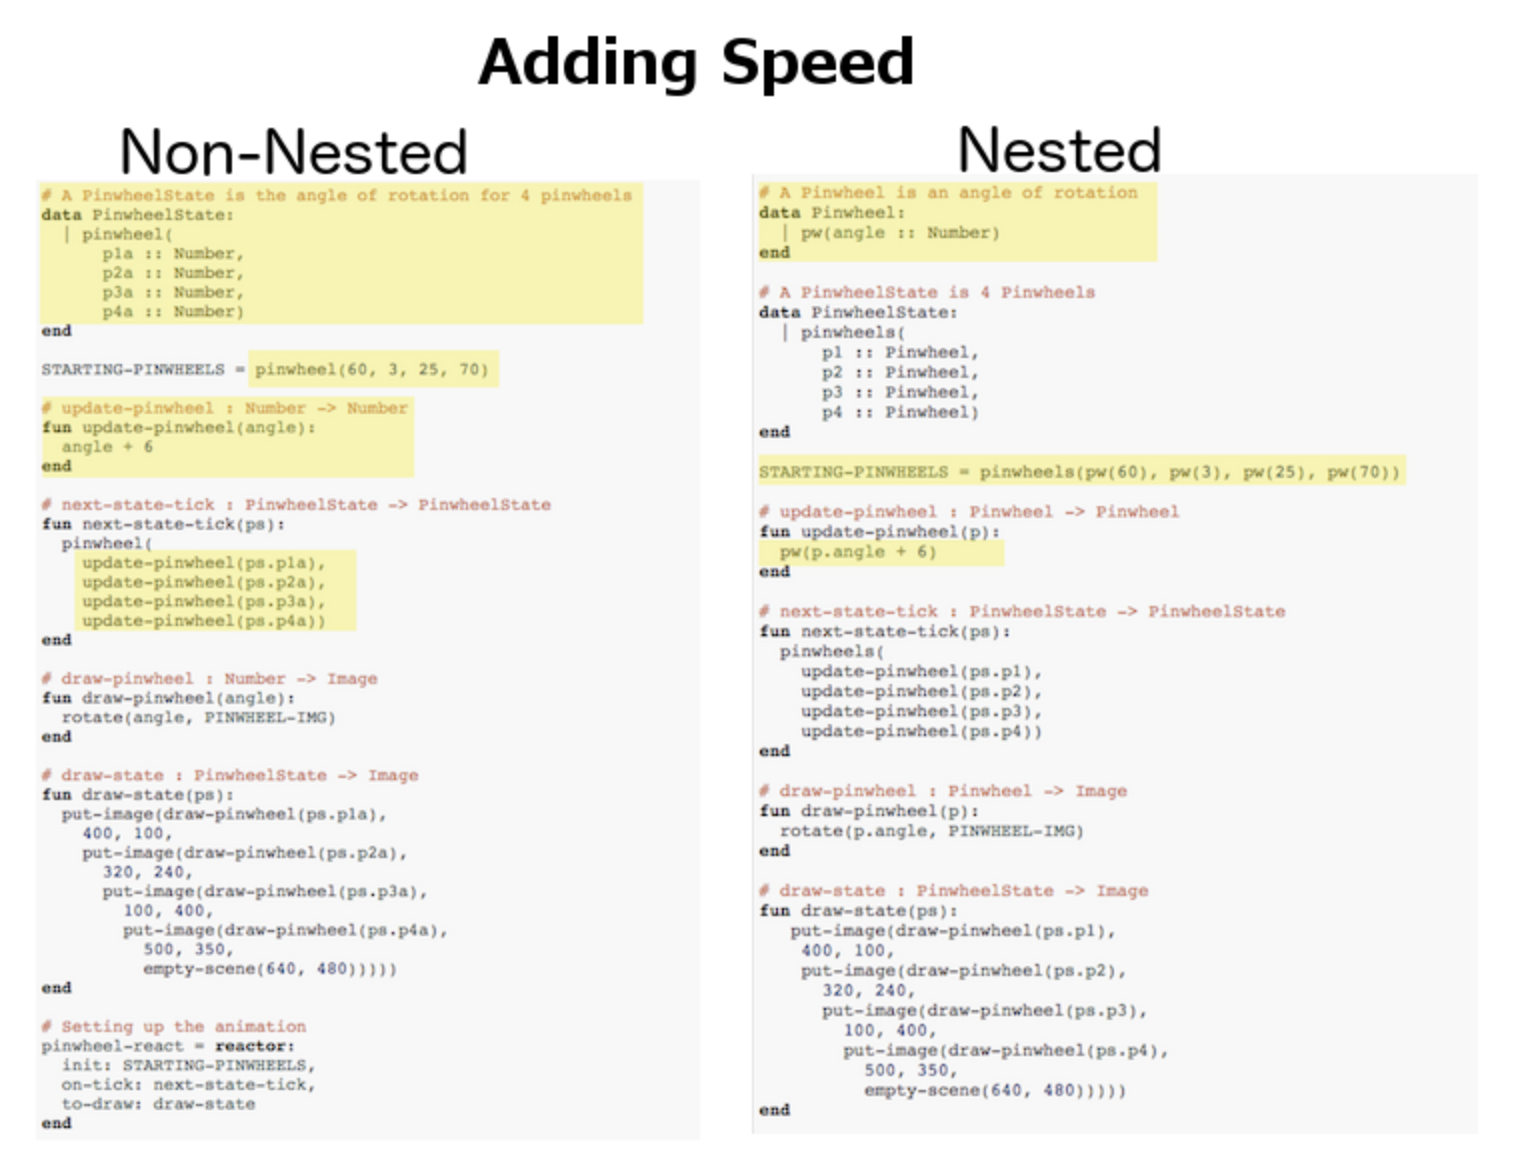
Just by looking at the differences on paper, we can see the difference in complexity of changing our animations. In order to make each pinwheel spin at a different speed, much more of the non-nested program will need to change, as opposed to the nested version where only the Pinwheel structure, STARTING-PINWHEELS instance, and the update-pinwheel function need to be edited.
What if we wanted to add a breeze to our animation, and make the pinwheels move across the screen to the left? Let’s assume that each pinwheel moves at the same speed, but each of their x-coordinates will need to change.
Go through the same process as before: Starting with the non-nested version of the code, print out these code screenshots:
-
Non-nested pinwheels
and underline or highlight the places in the code you would need to edit in order to change the x-coordinates of each pinwheel. Do this for both the nested and non-nested versions of the animation.
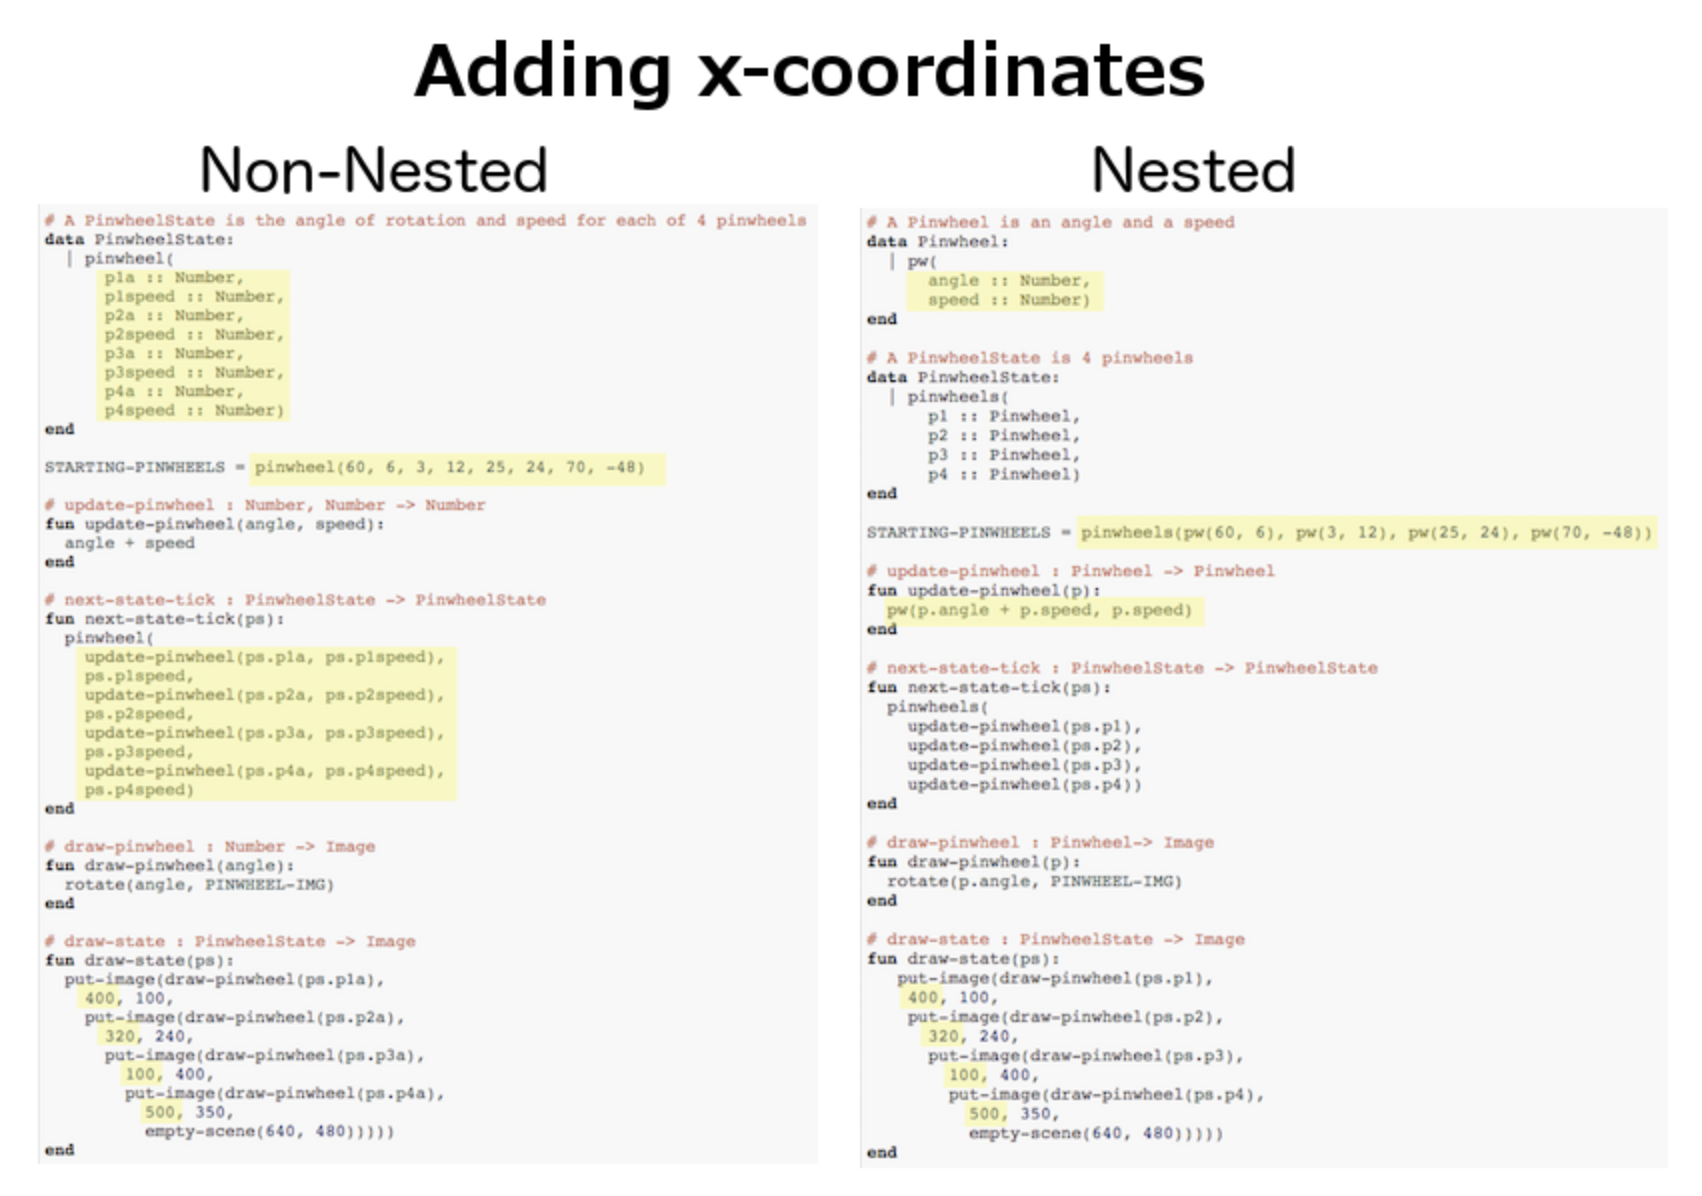
As before, we end up underlining, and needing to change much more of the code in the non-nested version of the animation. We also may realize something important about the non-nested code: if both a pinwheel’s angle of rotation and its x-coordinate are changing, we’re no longer able to use our update-pinwheel helper function. Previously, this function consumed an angle and speed, and added these numbers together to produce the new angle. However, since functions can only return one thing at a time, we can’t use this function to produce the updated angle and updated x-coordinate. Instead, the work of decreasing the x-coordinate must be done inside next-state-tick. Writing that code is nothing new, but wouldn’t it be nice to leave next-state-tick alone, and update each pinwheel individually inside the helper function?
Synthesize
Compare the updating functions for the non-nested version of the code:
# update-pinwheel :: Number, Number -> Number
fun update-pinwheel(angle, speed):
  angle + speed
end

# next-state-tick :: PinwheelState -> PinwheelState
fun next-state-tick(ps):
  pinwheel(
    update-pinwheel(ps.p1a, ps.p1speed),
    ps.p1speed,
    ps.p1x - 5,
    update-pinwheel(ps.p2a, ps.p2speed),
    ps.p2speed,
    ps.p2x - 5,
    update-pinwheel(ps.p3a, ps.p3speed),
    ps.p3speed,
    ps.p3x - 5,
    update-pinwheel(ps.p4a, ps.p4speed),
    ps.p4speed,
    ps.p4x - 5)
end

And the nested version:
# update-pinwheel :: Pinwheel -> Pinwheel
fun update-pinwheel(p):
  pw(p.angle + p.speed, p.speed, p.x - 5)
end

# next-state-tick :: PinwheelState -> PinwheelState
fun next-state-tick(ps):
  pinwheels(
    update-pinwheel(ps.p1),
    update-pinwheel(ps.p2),
    update-pinwheel(ps.p3),
    update-pinwheel(ps.p4))
end
Not only is the version which uses nested structures much shorter, it’s also much more readable. Using a nested structure affords us a unique opportunity for abstraction. If each pinwheel moves the same way, we can use one helper function on all of them, each time consuming a pinwheel and producing the updated pinwheel. This way the only function that needs to change is the one which addresses the "child" structure (in this case, update-pinwheel, which consumes a Pinwheel), and the function next-state-tick, which consumes the "parent" structure PinwheelState, can stay unchanged. This offers you lots more flexibility when making changes to your code, or adding things to a program.
You’ve seen how nested structures work inside a simple animation, but what about a more complex video game? Let’s return to he Ninja Cat game from Bootstrap:Algebra. Here’s the original data block and some sample instances from Ninja Cat:
# A GameState is a Player's x and y-coordinate, danger's x and y coordinate and speed, and target's x and y coordinate and speed
data GameState:
    game(
      playerx :: Number,
      playery :: Number,
      dangerx :: Number,
      dangery :: Number,
      dangerspeed :: Number,
      targetx :: Number,
      targety :: Number,
      targetspeed :: Number,
      score :: Number)
end

# Some sample GameStates
START = game(320, 100, 600, 75, 5, 1500, 250, 10, 0)
PLAY  = game(320, 100, 600, 75, 5, 300, 250, 20, 0)
And here’s the same game made with nested structures. To clean up the GameState structure, make it easier to read, and allow more flexibility in our code, we defined a new structure to represent a Character, which contains a single set of x and y-coordinates:
# A Character is an x and y-coordinate
data Character:
    char(
      x :: Number,
      y :: Number)
end

data GameState:
    game(
      player :: Character,
      danger :: Character,
      dangerspeed :: Number,
      target :: Character,
      targetspeed :: Number,
      score :: Number)
end

# Some sample GameStates
START = game(char(320, 100), char(600, 75), 5, char(1500, 250), 10, 0)
PLAY  = game(char(320, 100), char(600, 75), 5, char(300, 250), 20, 0)
For the nested structures version of Ninja Cat:
-
How would you get the player’s x-coordinate out of START?
-
What about the danger’s y-coordinate?
-
How would you get the target’s speed out of PLAY?
-
Finally, what do you notice about these two versions of the Ninja Cat data? Which do you prefer, and why?
Have students discuss the pros and cons of writing a game using nested or non-nested structures.
Now take a look at YOUR video games. If you were to re-write your program to use nested structures, what would it look like? Do you have multiple characters in your game with their own x, y, and speed? Do you have any opportunities to use helper functions to move characters in the same way?
For practice, re-write the data block and sample instances for your video game using nested structures.
These materials were developed partly through support of the National Science Foundation,
(awards 1042210, 1535276, 1648684, and 1738598).
Bootstrap:Reactive by Emma Youndtsmith, Emmanuel Schanzer, Kathi Fisler, Shriram Krishnamurthi, Joe Politz and Dorai Sitaram
is licensed under a
Creative Commons 4.0 Unported License.
Based on a work at www.BootstrapWorld.org.
Permissions beyond the scope of this license may be available by contacting
schanzer@BootstrapWorld.org.
Feature: Timers
Feature: Timers
Students parameterize other parts of their game, so that the experience changes as a new data field, a timer, changes. This track delves deeper into conditionals and abstraction, offering students two possible uses for a timer feature, and a chance to customize their games further while applying those concepts.
Prerequisites |
None |
|||||||||||||||
Product Outcomes |
|
|||||||||||||||
Materials |
||||||||||||||||
Language Table |
|
|||||||||||||||
Preparation |
The Watermelon Smash Starter file preloaded on students’ machines |
- constructor
-
a function that creates instances of a data structure
Adding a Splash Screen 30 minutes
Overview
One of the simplest uses for a timer is a splash screen: something that is shown for a few seconds when you first run a game. Students implement a splash screen for their games, as a way of getting comfortable with the idea of passing a timer into their Reactor.
Launch
Timers are a key component in many video games: players may need to reach a certain objective before time runs out, or keep from losing a game for longer and longer periods of time to reach a high score. In this feature, we’ll cover two possible uses of a timer in your game: adding a “splash screen” at the beginning to give instructions to the player, and adding a short animation when two characters collide.
Of course, a timer is a piece of data in our game that will be changing, meaning it should be added to our data structure. We’ll be adding a timer to the completed Moving Character file from Unit 5, and you can follow along using the same file, or your own video game project.
Investigate
Add a field called “timer” to the data structure, represented by a Number. Then, go through your code and add that field to each constructor call in your code. Once complete, run your program to make sure there are no errors, then move on.
The next step is to find (or make!) the image you want displayed as your splash screen when the game begins. We’ve made a simple image of instructional text overlayed onto the background, and defined it using the name instructions.
instructions = overlay(text("Press the arrow keys to move!", 50, "purple"),
  rectangle(640, 480, "solid", "white"))
Encourage students to get creative here: In addition to giving instructions to a user, they can also use their splash screen to provide a backstory for their game, include names and images of their characters, and of course, note who created the game!
As of now, our Moving Character file doesn’t have a next-state-tick function, but if we want our timer to increase or decrease, we’ll have to add one. If you already have a next-state-tick function with the timer added to the State it produces, make it so the timer increases by 1 on every tick. Don’t forget to add on-tick: next-state-tick to the reactor once you finish! Our next-state-tick function looks like this:
# next-state-tick :: CharState -> CharState
fun next-state-tick(a-char):
  char(a-char.x, a-char.y, a-char.timer + 1)
end
(Note that the position of the character doesn’t change in next-state-tick. It only changes in response to keypresses, which is already handled in the next-state-key function.)
Now we have a timer added to our CharState structure, and it increases as the reactor runs. But how do we display our instructions screen based on the timer? The draw-state function handles how the game looks, so we’ll have to add some code to this function. In our starting CharState, which we named middle, we had the timer start at 0: middle = char(320, 240, 0). Since we made the timer increase by 1 every clock tick, we’ll display the instructions image as long as the timer is 100 or below.
By default, the computer’s clock ticks 28 times each second, so the instructions screen will be up for a bit less than 4 seconds.
We’ll need to change draw-state so that it becomes a piecewise function. If the given CharState’s timer is less than or equal to 100, (the very beginning of the game) our splash screen should be displayed. Otherwise, the image of Sam the butterfly should be displayed at the correct position on the background, which is what the current code already does. To change draw-state, we add one new if: branch, and add the original code to the else: clause.
# draw-state :: CharState -> Image
fun draw-state(a-char):
  if a-char.timer <= 100:
    instructions
  else:
    put-image(sam, a-char.x, a-char.y, rectangle(640, 480, "solid", "white"))
  end
end
Synthesize
Have students explain what’s going on in their own words. (We only want the splash screen to appear at the very start of the game, when the timer is below a certain amount. All other times, we should see the game itself.)
Click "Run", and test out your new feature! You may want to increase or decrease the amount of time your splash screen is displayed, or make changes to the image itself.
Following these steps, students should end up with something similar to this completed Moving Character file.
Timer-Based Animations 45 minutes
Overview
Students implement a timer-based animation, to create a temporary effect when a collision occurs.
Launch
Another way to use timers in a game is to add a short animation when a collision occurs. In this example, we’re going to add a timer to a simple animation, but you could extend this to add an animation to your game when two characters collide, when the player reaches a goal, etc.
Note that if students have already used a timer to add a splash screen to their game, they will not be able to use the same timer field to display a collision animation. Instead, they could implement a collision animation in a different game, or add another, seprate field to their data structure: animation-timer and instruction-timer, for instance.
Open the Watermelon Smash Starter file and click "Run".
Our goal is to make a complete animation of a watermelon getting smashed by a mallet. When the mallet reaches the melon, we should see some sort of pink explosion! We’ve gotten you started by including a data structure called SmashState, which contains the y-coordinate of a mallet and a timer. When the reactor begins, the initial state (defined here as START) defines the mallet at 250 and the timer at 0.
To start, let’s look at the draw-state function.
# draw-state :: SmashState -> Image
# draws the image of the watermelon and mallet on the screen.
fun draw-state(a-smash):
  put-image(MALLET, 275, a-smash.mallety,
    put-image(WATERMELON, 200, 75, BACKGROUND))
end
Currently, this function uses the images we’ve defined above (WATERMELON, MALLET, etc.) and draws the image of the mallet at x-coordinate 275 and the given SmashState’s current mallety, on top of the image of the watermelon, placed at the coordinates 200, 75 on the background. This code works for most of the animation, before the mallet hits the watermelon, but we want to see a pulpy explosion once it does.
-
When should we see a watermelon pulp explosion in this animation? What must be true about the given
SmashState? -
Which image should we replace to show the explosion animation? The mallet, or the watermelon?
Once the mallet reaches the watermelon (around y-coordinate 140), we should replace the watermelon image with one representing an explosion. Here, we’ll use a radial star, whose contract is written below:
# radial-star :: Number, Number, Number, String, String -> Image
Practice making a few radial stars of different colrs and sizes in the interactions area. See if you can determine what each of the Number arguments represent.
Most importantly for our purposes, the second argument to radial-star represents the outer size of the star. Since we want this star to represent the exploding watermelon, and grow larger as the animation progresses, we can’t use a static number for the size. Instead, we want to use one of our changing values from the SmashState.
Which field should we use to represent the size of the growing explosion? mallety, or timer? Why?
mallety only represents the y-coordinate of the falling mallet, whereas the timer can be set and reset based on certain conditions to represent the changing size of the star image.
Investigate
Change the draw-state function to make it piecewise: when the mallet’s y-coordinate is 140 or less, draw the following image of the radial star (radial-star(20, a-smash.timer, 25, "solid", "deep-pink")) at the watermelon’s current coordinates. In all other cases, produce the current body of draw-state.
The updated draw-state function should look similar to:
# draw-state :: SmashState -> Image
# draws the image of the watermelon and mallet on the screen. When the
# mallet's y-coordinate reaches 140, draw the explosion
fun draw-state(a-smash):
  if (a-smash.mallety <= 140):
    put-image(radial-star(20, a-smash.timer, 25, "solid", "deep-pink"), 200, 75,
       BACKGROUND)
  else:
    put-image(MALLET, 275, a-smash.mallety,
    put-image(WATERMELON, 200, 75, BACKGROUND))
  end
end
Note to students that we haven’t done anything to change the value of a-state.timer yet! If the timer’s value is still 0, as it begins in our START state, we won’t see any star at all, even if our code is correct. We’ll work on changing the value of the timer in response to different conditions within the next-state-tick function.
Now take a look at the next-state-tick function defined below.
# next-state-tick :: SmashState -> SmashState
# Decreases the y-coordinate of the mallet every tick
fun next-state-tick(a-smash):
  smash(a-smash.mallety - 2, a-smash.timer)
end
Currently, this function decreases the mallet’s y-coordinate to make it fall, and doesn’t change the timer. However, if we want the size of our explosion to increase, at some point we’ll have to start increasing the timer (since the timer’s value also represents the size of our explosion animation).
When should we start increasing the timer, thereby increasing the size of the watermelon’s explosion animation?
For help, we can look back at our draw-state function. We only wanted to start drawing the explosion (the pink radial star) when mallety was less than or equal to 140. So we can check the same condition in next-state-tick to tell us when to start increasing the SmashState’s timer.
Turn next-state-tick into a piecewise function: once a-smash.mallety reaches 140 or less, continue decreasing it’s y-coordinate, but also increase the timer by 2. Use the original body of next-state-tick as your else clause.
The final version of next-state-tick should look similar to:
fun next-state-tick(a-smash):
  if (a-smash.mallety <= 140):
    smash(a-smash.mallety - 2, a-smash.timer + 2)
  else: smash(a-smash.mallety - 2, a-smash.timer)
  end
end
Run your program, and watch that watermelon get smashed!
For a challenge, change the draw-state function so that once the mallet has passed below a certain threshold, an image of the smashed watermelon (we’ve defined one called SMASHED) appears. Hint: Where within the draw-state function will this new condition need to be placed in order for it to work properly?
Closing
We’ve shown you a couple ways to use timers in your games and animations, but there are many more possibilities. You could extend the timer animation to add a short animation when two characters have collided, or display an ever-increasing timer on the screen to show players how long they have ben playing your game. What other uses for timers can you come up with?
These materials were developed partly through support of the National Science Foundation,
(awards 1042210, 1535276, 1648684, and 1738598).
Bootstrap:Reactive by Emma Youndtsmith, Emmanuel Schanzer, Kathi Fisler, Shriram Krishnamurthi, Joe Politz and Dorai Sitaram
is licensed under a
Creative Commons 4.0 Unported License.
Based on a work at www.BootstrapWorld.org.
Permissions beyond the scope of this license may be available by contacting
schanzer@BootstrapWorld.org.