Unit 1:   Videogames and Coordinate Planes

imageUnit 1Videogames and Coordinate Planes
Unit Overview

Students discuss the components of their favorite videogames, and discover that they can be reduced to a series of coordinates. They then explore coordinates in Cartesian space, and identify the coordinates for the characters in a game at various points in time. Once they are comfortable with coordinates, they brainstorm their own games and create sample coordinate lists for different points in time in their own game.

Product Outcomes:
  • In workbooks, students create a data model that describes a simple videogame

  • Students identify the coordinates of characters in a picture

  • Students complete the Videogame Design Worksheet to design their own game

  • Students convert several arithmetic expressions between multiple representations

Standards and Evidence Statements:

Standards with prefix BS are specific to Bootstrap; others are from the Common Core. Mouse over each standard to see its corresponding evidence statements. Our Standards Document shows which units cover each standard.

  • 5.G.1-2: Graph points on the coordinate plane to solve real-world and mathematical problems

    • Use a pair of perpendicular number lines, called axes, to define a coordinate system

    • Represent real world and mathematical problems by graphing points in the first quadrant of the coordinate plane, and interpret coordinate values of points in the context of the situation.

  • 5.OA.1-2: Write and interpret numerical expressions

    • Use parentheses, brackets, or braces in numerical expressions, and evaluate expressions with these symbols

    • Write simple expressions that record calculations with numbers, and interpret numerical expressions without evaluating them.

  • 6.NS.5-8: The student performs operations with negative numbers, works with the number line and coordinate plane, order and absolute value of numbers, and solves real-world problems with rational numbers.

    • graphs of negative numbers on the number line.

  • A-SSE.1-2: The student interprets the structure of expressions to solve problems in context

    • interpretation of complicated expressions by viewing one or more of their parts as a single entity

  • N-Q: The student reasons quantitatively in using units to solve problems

    • selection of (Identification of) appropriate quantities for the purpose of descriptive modeling

  • BS-CE: The student translates between structured expressions as arithmetic, code, and Circles of Evaluation

    • translating a simple (1-operation) equation into a Circle of Evaluation

    • translating a nested (multi-operation) equation into a Circle of Evaluation

    • translating a Circle of Evaluation into its equivalent arithmetic expression

    • translating a Circle of Evaluation into its equivalent programming syntax

  • BS-IDE: The student is familiar with using a REPL, entering expressions properly, and interpreting error messages

    • enter and evaluate expressions on the computer

    • look to error messages as a way of diagnosing syntax errors

  • BS-M: The student models a problem in context and determines the data needed to describe the problem

    • identifying which quantities are fixed and which are variable

  • BS-PL.1: The student is familiar with declaring values and applying built-in functions using the programming language

    • interpreting a function application and identifying its arguments

Length: 85 minutes
Glossary:
  • apply: use a given function on some inputs

  • arguments: the inputs to a function; expressions for arguments follow the name of a function

  • circle of evaluation: a diagram of the structure of an expression (arithmetic or code)

  • definitions window: the text box at the top of the Editor (DrRacket or WeScheme), where definitions for values and functions are written

  • editor: software in which you can write and evaluate code

  • error message: information from the computer about errors in code

  • evaluate: perform the computation in an expression, producing an answer

  • evaluates to: the result of computing an expression

  • expression: a computation written in the rules of some language (such as arithmetic, code, or a Circle of Evaluation)

  • function: a mathematical object that takes in some inputs and produces an output

  • interactions window: the text box at the top of the Editor (DrRacket or WeScheme), where we enter expressions to evaluate

  • legal expression: code that follows the Code Rules for a language

  • mathematical expression: a computation in arithmetic

  • programming language: a set of rules for writing code that a computer can evaluate

  • value: a specific piece of data, like 5 or "hello"

Materials:
  • Editing environment (WeScheme or DrRacket with the bootstrap-teachpack installed)

  • Cutouts of NinjaCat, Dog and the Ruby

  • Student Workbooks, and something to write with

Preparation:
  • OPTIONAL: Hand out Warmup activity sheet.

  • Computer for each student (or pair), running WeScheme or DrRacket

  • If using DrRacket, make sure the Ninja.rkt file is loaded

  • Student workbook folders with names on covers, and something to write with

  • Student Workbooks, and something to write with

  • Overhead projector

Types

Functions


Introduction

Overview

Learning Objectives

    Evidence Statements

      Product Outcomes

        Materials

          Preparation

          Introduction (Time 5 minutes)

          • Welcome to Bootstrap! In this course, you’ll be learning a new programming language - a way to tell computers exactly what you want them to do. Just like English, Spanish or French, a programming language has its own vocabulary and grammar that you’ll have to learn. Fortunately, the language you’ll be using here has a lot in common with simple math that you already know!

            Introduce the teaching staff. Give some background: age, where you’re from, something surprising about yourself, favorite food, etc. Anything to allow kids to connect. Ask kids for their names! Set expectations and rules for the class.

            Connect the material that’s to come with things students already know:

            • Talk to them about what makes a language - especially if you have students who speak a second or third language

            • Programming is very much a language, with its own syntax, semantics, etc

            • Ask students about their favorite videogames. Be open about the scale of a modern game: they cost millions of dollars, are built by huge teams of programmers and artists, and are developed over years.

            • Set expectations about what can be accomplished in a single, introductory programming class.

          Dissecting a Demo

          Overview

          Play a simple game, then take it apart and figure out what’s going on in the computer.

          Learning Objectives

          • Model a simple videogame

          Evidence Statements

          • Students will be able to identify the elements of a game and how each one changes during gameplay

          Product Outcomes

          • In workbooks, students create a data model that describes a simple videogame

          Materials

          • Editing environment (WeScheme or DrRacket with the bootstrap-teachpack installed)

          Preparation

          • Computer for each student (or pair), running WeScheme or DrRacket

          • If using DrRacket, make sure the Ninja.rkt file is loaded

          • Student workbook folders with names on covers, and something to write with

          Dissecting a Demo (Time 10 minutes)

          • Let’s begin by exploring a simple videogame, and then figuring out how it works. Open this link to play the game, and spend a minute or two exploring it. You can use the arrow keys to move the cat left, right and jump - try to catch the ruby and avoid the dog!

            Show the kids Ninjacat. Be sure to end on a frozen frame of the game, so the whole class can see the same image.

          • This game is made up of characters, each of which has its own behavior. The Ruby moves from the right to the left, as does the Dog. NinjaCat only moves when you hit the arrow keys, and she can move left, right, up and down. We can figure out how the game works by first understanding how each character works.

          • image Turn to Page 1 in your workbook. Here we have a table, which we’ll use to reverse-engineer NinjaCat and see how it works. Fill out the first column with a complete list of all things in the game.

            This can be a team activity. Solicit a few examples from students, to make sure they understand what’s being listed here: nouns like "the cat", not verbs like "jumping".

            During this activity, walk around and see how groups are doing. This is the time to encourage expectations of community and respect - call out good teamwork when you see it! When time is up, give them a countdown: "30...10... 5... 4... 3... 2... 1... PENCILS DOWN, EYES UP HERE!" Wait for total silence and complete attention.

          • Did you list all four moving characters? What else is in the game? Is the background a part of the game? The score?

            Have students come up to the board, and fill in the table with what they’ve found. If time is short, call on students and have them tell you what to write.

          • image
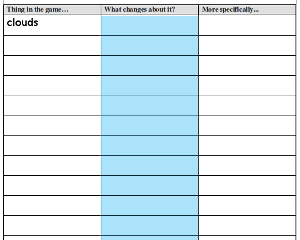
We also need to think about what is changing when we play the game. What about the Ruby? Does it get bigger? Does it change color? Does it spin around? The only thing that changes about the Ruby is its position! Everything else about it is the same. What about the Dog? The Cat? Fill in the rest of the second column, listing everything that changes about each character.

          • Did you notice that the Dog, Ruby, Cloud and Cat only change position, and nothing else? What about the Background - it doesn’t change at all, so we can leave that cell in table blank! Did you notice the Score changes value? You’ll want to add that to your table, too!

            Quickly fill in the second column on the board. Assign scores.

          Coordinate Planes

          Overview

          Students must use the Cartesian plane to describe the location of characters in a picture.

          Learning Objectives

          • Understand the use of number lines in defining locations via coordinates

          Evidence Statements

          • Students apply the number line as a tool for objectively defining location, first identifying how to apply it to describe the position of a character onscreen in one dimension. This understanding is extended to two dimensions, ultimately motivating the use of a coordinate grid.

          Product Outcomes

          • Students identify the coordinates of characters in a picture

          Materials

          • Cutouts of NinjaCat, Dog and the Ruby

          • Student Workbooks, and something to write with

          Preparation

          • Student Workbooks, and something to write with

          Coordinate Planes (Time 15 minutes)

          • image
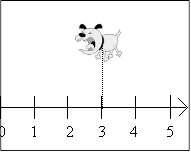
Computers use numbers to represent a character’s position onscreen, using number lines as rulers to measure the distance from the bottom-left corner of the screen. For our videogame, we will place the numberline so that the screen runs from 0 (on the left) to 640 (on the right). We can take the image of the Dog, stick it anywhere on the line, and measure the distance back to the lefthand edge. Anyone else who knows about our number line will be able to duplicate the exact position of the Dog, knowing only the number. What is the coordinate of the Dog on the righthand side of the screen? The center? What coordinate would place the Dog beyond the lefthand edge of the screen?

            The key point for students here is precision and objectivity. There are many possible correct answers, but students should understand why any solution should be accurate and unambiguous. This requires students to propose solutions that share a common "zero" (the starting point of their number line) and direction (literally, the direction from which a character’s position is measured).

            Have students discuss this. If time allows, have a student leave the room and let other students come up with ways to write down where the dog is on the board. Then remove the dog, call in the other student, and have the class direct them using only what they’ve written down.Try positioning the characters at different places on the line, and have students tell you what their coordinates are. Try giving them verbal descriptions (e.g. "The center of the screen", "Off the righthand side of the screen", etc.) and have them translate those into coordinates.

          • image
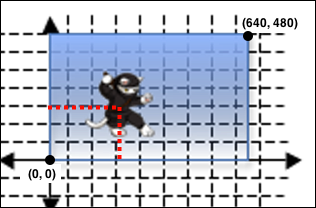
By adding a second number line, we can locate a character anywhere on the screen in either dimension. The first line is called the x-axis, which runs from left to right. The second line, which runs up and down, is called the y-axis. A 2-dimensional coordinate consists of both the x- and y-locations on the axes. Suppose we wanted to locate NinjaCat’s position on the screen. We can find the x-coordinate by dropping a line down from NinjaCat and read the position on the number line. The y-coordinate is found by running a line to the y-axis.

            A coordinate represents a single point, and an image is (by definition) many points. Some students will ask whether a character’s coordinate refers to the center of the image, or one of the corners. In this particular program, the center serves as the coordinate - but other programs may use another location. The important point in discussion with students is that there is flexibility here, as long as the convention is used consistently.

            If time allows, invite volunteers up to the board to try placing NinjaCat and the Ruby at different locations. Have students identify the coordinates at the corners of the screen. For additional practice, have students bisect each side of the screen and label the midpoints.

          • When we write down these coordinates, we always put the x before the y (just like in the alphabet!). Most of the time, you’ll see coordinates written like this: (200, 50) meaning that the x-coordinate is 200 and the y-coordinate is 50.

          • Depending on how a character moves, their position might change only along the x-axis, only along the y-axis, or both. Look back to the table you wrote in the workbook (Page 1). Can NinjaCat move up and down in the game? Can she move left and right? So what’s changing: her x-coordinate, her y-coordinate, or both? What about the clouds? Do they move up and down? Left and right? Both?

          • image
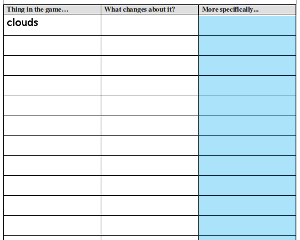
Fill in the rest of the table, identifying what is changing for each of your characters.

          • Turn to Page 2 in your game-planning workbook, and look at the project sheet that has a picture of the NinjaCat game. What are the coordinates at the bottom-left corner of the screen? Top-right? Center? For practice, label the coordinates at the midpoint of each side of the screen, then label the coordinates of each of the characters.

          Brainstorming

          Overview

          Students select the theme and characters for their videogame

          Learning Objectives

            Evidence Statements

              Product Outcomes

              • Students complete the Videogame Design Worksheet to design their own game

              Materials

              Preparation

              • Computer for each student (or pair), running WeScheme or DrRacket

              • If using DrRacket, make sure the Ninja.rkt file is loaded

              • Student Workbooks, and something to write with

              Brainstorming (Time 15 minutes)

              • On Page 3, you’ll find a planning template for you to make your own game. Just like we made a list of everything in the NinjaCat game, we’re going to start with a list of everything in your game.

                Put your names at the top of this page.

              • To start, your game will have with four things in it:

                • A Background, such as a forest, a city, space, etc.

                • A Player, who can move when the user hits a key.

                • A Target, which flies from the right to the left, and gives the player points for hitting it.

                • A Danger, which flies from the right to the left, which the player must avoid.

                Have students walk through some sample themes, to make sure they understand the format of the game. For example: A football game might have a quarterback for the player, a rival player for the danger, and a football as the target. A jungle game might have a monkey as the player, a snake as the danger, and bananas as the target.

              • Now it’s time to get creative! Fill out Page 3 in your workbook for your game, using your own player, target and danger.

                Be sure to consult with every team. A lot of students will have trouble fitting their ideas into this format, or they’ll struggle with coordinates. Be clear about what can and cannot be done! (e.g. - no 3d games, joysticks, multiplayer games, etc. Hint: students who have a well-worded description of their images will be happier with any images you could find them. Try searching for "Person" versus "Jogger", for example.

              Order of Operations

              Overview

              Students identify the order of operations for complicated arithmetic expressions through diagramming (circles) and evaluating (the numerical answer). This lesson introduces students to the Circle of Evaluation, which is a sentence diagramming tool for arithmetic expressions. This is a powerful way to understand Order of Operations, as it forces students to focus on the structure of expressions over their computed result.

              Learning Objectives

              • Understand the structure of arithmetic expressions

              • Understand order of operations in an expression

              • Write expressions as Circles of Evaluation

              • Translate between Circle of Evaluation and arithmetic expressions

              Evidence Statements

              • Students will be able to explain why arithemetic expressions require structure

              • Students will be able to identify the order of operations in an expression that includes adding, subtracting, multiplying and dividing

              • Given a Circle of Evaluation, students will be able translate the expression into the arithmetic expression it represents

              • Given an arithmetic expression, students will be able to complete a partially-finished Circle of Evaluation for the same expression

              • Given a bank of Circles of Evaluation and arithmetic expressions, students will be able to match them

              • Students will be able to translate the structure of an arithmetic expression into a Circle of Evaluation

              Product Outcomes

              • Students convert several arithmetic expressions between multiple representations

              Materials

              • Editing environment (WeScheme or DrRacket with the bootstrap-teachpack installed)

              Preparation

              • Computer for each student (or pair), running WeScheme or DrRacket

              • If using DrRacket, make sure the Ninja.rkt file is loaded

              • Student Workbooks, and something to write with

              Order of Operations (Time 20 minutes)

              • Math is a language, just like English, Spanish, or any other language. We use nouns, like "bread", "tomato", "mustard" and "cheese" to describe physical objects. Math has values, like the numbers , or , to describe quantities. Humans also use verbs like "toast", "slice", "spread" and "melt" to describe operations on these nouns. Mathematics has functions like addition and subtraction, which are operations performed on numbers. Just as you can "slice piece of bread", a person can also "add four and five".

                Students should begin to look at math as a language. To help them with this, you can discuss syntax and grammar of math, and its potential for ambiguity in the absence of a fixed order of operations. Help students see that math is a way to communicate calculations among people.

              • A mathematical expression is like a sentence: it’s an instruction for doing something. The expression tells us to add 4 and 5. To evaluate an expression, we follow the instructions in the expression. The expression evaluates to .

                What does evaluate to? What does evaluate to? What does evaluate to?

              • Sometimes, we need multiple expressions to accomplish a task. If you were to write instructions for making a sandwich, it would matter very much which came first: melting the cheese, slicing the bread, spreading the mustard, etc. The order of functions matters in mathematics, too. If someone says "four plus two minus one", they could mean several things:

                • Add four and two, then subtract one:

                • Add four to the result of subtracting one from two:

                Write an expression of your own that can mean several things.

              • Depending on which way you read the expression, you might have very different results! This is a problem, because we often use math to share calculations between people. For example, you and your cell phone company should agree upfront on how much you will pay for sending text messages and making calls. Different results might mean that your bill looks wrong. We avoid problems by agreeing on the order in which to use the different operations in an expression. There are two ways to do this:

                1. We can all agree on an order to use

                2. We can add detail to expressions that indicate the order

                Write down one reason why it is important to have rules about the order of operations.

              • image 
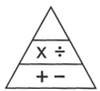
Mathematicians didn’t always agree on the order of operations, but now we have a common set of rules for how to evaluate expressions. The pyramid on the right summarizes the order. When evaluating an expression, we begin by applying the operations written at the top of the pyramid (multiplication and division). Only after we have completed all of those operations can we move down to the lower level. If both operations are present (as in ), we read the expression from left to right, applying the operations in the order in which they appear.

                In what order should we apply the functions in the following example?

                This item covers PEMDAS (order of operations in ambiguous expressions). You can skip this item if you do not need to cover PEMDAS.

              • image One way to indicate the order of operations in an expression is to first draw the expression as a diagram. This diagram is called a Circle of Evaluation. Here you can see an example of a Circle of Evaluation, for the math expression . Circles of Evaluation show the structure that’s going on inside an expression. All Circles of Evaluation have two rules:

                image
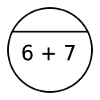
Which rule does this Circle of Evaluation break?

                This section benefits enormously from visual aids, diagrams, etc. Make sure you have plenty of board space to draw examples!

              • Try drawing the Circle of Evaluation for each of the following expressions:

                image Every Circle of Evaluation evaluates to the result of its corresponding expression. For example, the circle on the right evaluates to , because the circle says to use subtraction (the function at the top) on the numbers in order ().

                It’s important for students to view the Circles of Evaluation as "just another way of writing arithemetic". Have students discuss whether associativity and commutativity still matter here (they do).

              • image
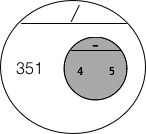
To use multiple functions in the same expression, we can combine Circles of Evaluation. Look at the Circle of Evaluation you’ve written for . We already know that the Circle for will evaluate to , so we can replace the number with the expression. Does this change what the expression evaluates to?

                image
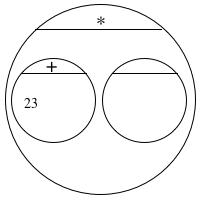
Finish writing the Circle of Evaluation shown here, so that it represents

                From this point forward, the Circles of Evaluation are your assessment tool for Order of Operations. Quizzing students by asking them to correctly evaluate an expression is fraught with false negatives, as many student might get the order right but may still have problems with basic calculations. This method is also vulnerable to Commutativity, since a student will correctly evaluate even if they get the order of operations wrong! Circles of Evaluation have neither of these flaws, as they put the emphasis where it should be: exercising a student’s ability to see the structure inside the arithemetic.

              • imageWhat does this Circle of Evaluation evaluate to? Let’s review how we evaluate a Circle:

                • We know we are multiplying because that’s the function at the top of the Circle.

                • The Number is the first number in the multiplication, because it’s on the left-hand side.

                • The second number in the multiplication is on the right-hand side. The right-hand side has a separate circle, so we need to evaluate the number for that circle. The second number is therefore the result of adding 4 and 5.

                • (the inner circle) evaluates to , and (the outer circle) evaluates to . This circle evaluates to .

                imageConvert this Circle of Evaluation into an arithmetic expression.

                Work through several of these examples with students, asking them to come up with arithmetic expressions and then convert them into Circles, or giving them Circles and having them translate them back into arithmetic. When you talk about Circles, be sure to consistently use the term function for what’s on top, rather than similar terms like "operation", "symbol", "procedure", "name", etc. The Circles of Evaluation will help students see the similarity between arithmetic functions (like ) and algebraic functions (like ) if you use terminology carefully.

              • Match the following Circles of Evaluation with the corresponding arithmetic expressions:

                • (/ (+ 24)(- 63))
                • (- (* 94)3)
                • (* -52)
                • (* 9(- 43))
                • (* (- 93)4)
              Intro to Programming

              Overview

              Students are introduced to the programming environment

              Learning Objectives

              • Convert Circles of Evaluation into code

              • Enter and evaluate code expressions for arithmetic on the computer

              • Understand the goal of error messages from the computer

              Evidence Statements

              • Students will be able to identify the Interactions and Definitions windows

              • Students will be able to enter and evaluate simple arithmetic expressions in the Interactions window

              • Students will be able to convert Circles of Evaluation into correctly-formed programs

              • Students will be able to explain an ’unbounded identifier’ error message

              • Students will be able to explain the purpose of error messages

              • Given a Circle of Evaluation, students will be able to complete a partially-written program

              • Given a bank of Circles of Evaluation and programs, students will be able to match them

              Product Outcomes

                Materials

                • Editing environment (WeScheme or DrRacket with the bootstrap-teachpack installed)

                Preparation

                • Computer for each student (or pair), running WeScheme or DrRacket

                • Student Workbooks, and something to write with

                • Overhead projector

                Intro to Programming (Time 15 minutes)

                • Open the programming tool of your choice: If you’ve installed, DrRacket, double-click the application to launch it. If you are using the online-tool, click here to log in enter your username and password to log in, then click "Start a New Program".

                  Have the students look at the editor on their computers. Refer to overhead projector as necessary.

                • image
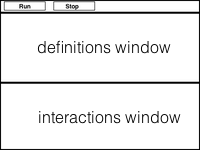
This screen is called the
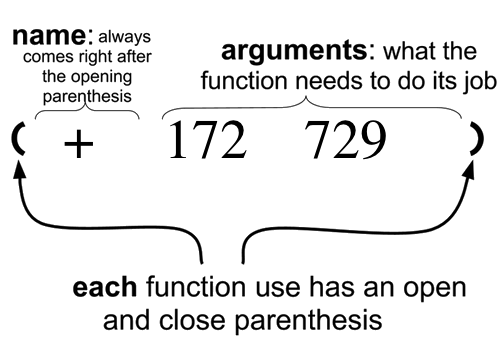
 editor, and it looks something like the diagram you see here. There are a few buttons at the top, but most of the screen is taken up by two large boxes: the Definitions window at the top and the Interactions window at the bottom.

                  The Definitions window is where programmers define values and functions in their program, while the Interactions window allows them to experiment with those values and functions. This is analogous to writing a series of function definitions on a blackboard, and having student evaluate expressions using those function on scrap paper. As students are not yet defining values of their own, it is not important that students understand this distinction right now. For now, we will work only with the Interactions window.

                • A program is a legal expression that, when evaluated, produces a value. You’ve been writing programs using mathematical expressions since you first learned how to add! Just as in English, there are rules that determine whether a sentence makes sense. Programs have rules too! A program can be very complicated, but it doesn’t have to be: the simplest programs of all are just Numbers.

                  Draw students’ attention to the Language Table (see Lesson Overview for Unit 1), which currently sits empty. Add "Numbers" to the Types section of the language table.

                • What do you think 4 will evaluate to? Click here to test it out.

                  • Enter 4 in the Interactions window and hit "Return". You will see the value 4 appear on the next line in the Interactions window.

                  • Type 10 in the Interactions window and hit "Return". Now the value 10 appears in the Interactions window.

                  • Try evaluating numbers, like 10345017, or negative numbers, like -2. Is there a limit to how big a number can be? What happens if you write a decimal? What happens when you click on a decimal, like 1.5? You get a new type of number, a fraction, like 3/4.

                  The editing environment evaluates all fractions and returns them as decimals by default. This can be surprising to students at first, so you may want to take a moment to explain what’s going on, and show them that these decimals can be converted back to fractions just by clicking on them. The environment uses standard annotations for repeating, non-terminating decimal expressions and properly handles expressions like . If you want to work with those kinds of numbers in your class, enter them to get familiar with how they appear in the Interactions window.

                • The computer obviously knows about Numbers, but what happens if you type in something that it doesn’t know about? Will it complain? Crash? Guess? Try asking the computer to evaluate dog in the Interactions window.

                  These error messages are really useful for programmers. Rather than saying "this program doesn’t work", the computer does the best it can to tell you what went wrong, and to give you as much information as possible to help you fix the problem. Make sure you always read these messages carefully!

                  The error message uses the term "variable". Don’t worry if your students don’t already know this term; we will teach it to them shortly. For now, students just need to get used to error messages and the kinds of problems that they catch in programs.

                • The Circles of Evaluation are also easy to convert into computer programs. To translate a Circle of Evaluation into a program, begin with an open parenthesis (, and then the function written at the top of the circle. Then translate the inputs from left to right in the same way, adding a closing parenthesis ) when you’re done. This process gives us the second rule for expressions: imageHere is the code for this Circle of Evaluation: (- 4 5)

                  See what happens when this code is entered into the Interactions window. Press the Return key to evaluate the program. You should see as an answer.

                  Have students practice converting simple Circles of Evaluation into code. If you want to help students understand when to use the parentheses, here are two explanations that we find useful. First, the parens look like the Circle, and the Circle encloses the function name and its inputs. Second, we use a more visual description of an ant eating its way through the expression. The ant eats into the Circle (an open paren), then goes to the function at the top, then to the arguments from left to right, then finally out of the Circle (a close paren). If the ant encounters another Circle while writing down the arguments, it needs another open paren, etc.

                • imageWhen a Circle of Evaluation has other circles inside of it, the translation still follows the same rules: each Circle requires a new set of parentheses: (* 6 (+ 4 5))
                  • Try entering this code into the Interactions window. What should the program evaluate to when you hit Return?

                  • Practice converting other Circles of Evaluation you’ve drawn into code.

                  Scaffolding for Pair Programming: Talk to students about the roles of Driver and Navigator. The Driver is the student with their hands on the keyboard - they’re in charge of typing, using the mouse, etc. The Navigator should be telling the Driver what to type, and pointing out mistakes or suggesting things. It’s important to clarify what these roles are (perhaps reinforcing them with a visual), to ensure that both partners are active and talking to one another about the task at hand.

                • For practice, turn to Page 4 in your workbook. For each mathematical expression, draw the Circle of Evaluation, then convert that Circle into Racket code.

                • When expressions don’t follow the code rules, the computer will tell you that it found a problem. The computer also gives you information to help you fix the problem. This information is called an error message. We’ll talk more about error messages later. For now, we just want you to see a couple of error messages so that you’ll know what they are if you run into one while programming.

                  Enter each of the following illegal expressions in the Interactions Window and look at the error message or behavior that the computer gives you.

                  • (5 * 6) [puts the function in the middle, instead of at the front]

                  • (*5 6) [missing a space after the function]

                  • * 5 6) [forgets the open parenthesis]

                  • (* 5 6 [forgets the close parenthesis]

                  At this point, the goal is simply to have students see error messages, so they know that they mean "something went wrong". Students are not expected to be experts at reading error messages this early (you will drill this later). When a close parenthesis is missing, hitting return will do nothing, because the computer is waiting for the parenthesis. When an open parenthesis is missing, the computer either reports an error (DrRacket) or does nothing (WeScheme), waiting for the programmer to add the parens. If students hit enter and "nothing happens", they should check their parentheses. Also note that if you do this sequence of exercises with + instead of *, the error appears different because +5 is actually a number (just like -5). You don’t need to show this to students now, just be aware of it for yourself in case it comes up in class.

                Closing

                Overview

                Learning Objectives

                  Evidence Statements

                    Product Outcomes

                      Materials

                        Preparation

                          Closing (Time 5 minutes)

                          • You’ve done a lot in this first unit!

                            • You took a game apart to see how the parts move

                            • You designed your own game, that you’ll make during this course

                            • You practiced using coordinates to put characters into a screen

                            • You learned about order of operations, Circles of Evaluation, how to turn Circles of Evaluation into programs, and how to run those programs to get answers.

                            In the next unit, we’ll begin writing programs for more interesting things than just arithmetic.

                            Make sure student names are on page 3. Take page 3 itself, or take photos of page 3, to prep game images for a later Unit.