NOTE: THESE LESSONS ARE NOT INTENDED TO BE TAUGHT IN SEQUENCE - they are collected here solely for convenience!
Students will deepen their understanding of various concepts, either through continued practice and review,
encountering more complicated material (structs).
Students create scaled, rotated, flipped, and layered images
Students create images for various nations’ flags
Students complete red-shape, which produces different shapes based on the input string
Standards and Evidence Statements:
Standards with prefix BS are specific to Bootstrap; others are from the Common Core. Mouse over each standard to see its corresponding evidence statements. Our Standards Document shows which units cover each standard.
A-SSE.1-2: The student interprets the structure of expressions to solve problems in context
F-IF.1-3: The student uses function notation to describe, evaluate, and interpret functions in terms of domain and range
F-IF.4-6: The student interprets the behavior of functions that arise in applications in terms of the context
F-IF.7-9: The student uses different representations of a function to make generalizations about key features of function behavior and to compare functions to one another
F-LE.5: The student interprets expressions for functions in terms of the situations they model
MP.1: Make sense of problems and persevere in solving them
MP.7: Look for and make use of structure
Length: 80 Minutes
Glossary:
data structure: A datatype which packages several datatypes as fields
domain: the type of data that a function expects
range: the type of data that a function produces
Materials:
Editing environment (WeScheme or DrRacket with the bootstrap-teachpack installed)
Pens/pencils for the students, fresh whiteboard markers for teachers
Class posters (List of rules, basic skills, course calendar)
Language Table (see below)
Preparation:
Computer for each student (or pair), running WeScheme or DrRacket (If using DrRacket, make sure the Images.rkt file is loaded)
Student Workbooks, and something to write with
Types
Functions
Values
Manipulating Images
Overview
Introduces additional operations on images. As students use these operations to create more interesting images, they can practice function composition, fitting contracts together, and writing nested expressions.
Learning Objectives
Learn how to use advanced image operations
Practice function composition
Practice using contracts to help with composing operations
Practice writing and evaluating nested expressions
Learn how to import gif, png, and other images from files
Product Outcomes
Students create scaled, rotated, flipped, and layered images
Materials
Editing environment (WeScheme or DrRacket with the bootstrap-teachpack installed)
Preparation
Computer for each student (or pair), running WeScheme or DrRacket (If using DrRacket, make sure the Images.rkt file is loaded)
Student Workbooks, and something to write with
Manipulating Images(Time 20 minutes)
Manipulating ImagesEarlier, you learned how to create simple images using operators such as circle, rectangle, and triangle. We can combine or manipulate these basic shapes to make more interesting ones, the same way we can combine and manipulate numbers. In this lesson, you’ll learn Racket functions for manipulating and combining images.
Use of the board is critical in this activity - you’ll want to have lots of room to write, and lots of visuals for students to see. Have students review some of the Image-producing functions they already know (triangle, circle, etc.). Quiz them on the contracts for these functions.
Imagine that we wanted to make an image of a simple satellite that looks like the one shown here. This image contains a blue circle and a red rectangle, with the circle on top of the rectangle. Racket has a function called overlay, which lets you put one image on top of another. Here is its contract, and a purpose statement that explains what it does:
Start out by reminding students why contracts matter: they specify types instead of values, which makes them really flexible! You can demonstrate this by showing them the code for a simple image, and then replacing the size of the triangle with a sub-expression:
This sets students up to see overlay as a logical extension - instead of image-producing Circles of Evaluation with number-producing subexpressions, there can be image-producing Circles with image-producing subexpressions.
Using overlay, we could make a picture of a satellite. Take a look at the code below, then hit "enter" and see what shape it makes! Can you change the color of the circle? The size of the rectangle? Can you use overlay to put a star on top of both the star and the rectangle?
See an example.
Before students type in the code and try it out, ask the class what they think will happen - what will the size be? The color? The text?
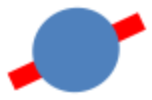
This satellite is flying level in the sky. What if a strong wind were blowing, causing the satellite to fly slightly on its side, like the image seen here? Then, we would want the Racket rotate function:
Try copying and pasting this code into the editor, and see what shape you get. What happens if you change the number 30?
Have the class convert this code into a Circle of Evaluation.
Let’s look at this code, viewed as a Circle of Evaluation. Our rotate function is shown here, in the blue circle. 30 is the number of degrees we’ll be rotating, and the second input is the Image we want to rotate. That image is the result of overlaying the circle and the rectangle, shown here in red. By looking at this Circle of Evaluation, can you guess the contract for the rotate function?
Can students write the code or draw the Circle of Evaluation for rotating a difference shape by a different amount? Try using a subexpression like (* 2 75) for the rotation, instead of a simple number.
Here are the contract and purpose for rotate:
When it’s time to introduce the new functions, start out by showing them the contract and then an example, as it does in the student guide. Make sure to ask lots of "how do you know?" questions during the code, to remind them that the contract has all the necessary information.
Suppose you wanted to make the satellite bigger, by scaling it up to 2x or 3x it’s original size. Racket has a function that will do just that, called scale. Here is the contract and purpose statement for scale:
Below is some code that will scale a star to make it one-half the original size. What would you change to make it bigger instead of smaller? What would you need to change to scale a different-color star? What if you wanted to scale a circle instead? Can you figure out how to scale the entire spaceship?
There are also functions for flipping an image horizontally or vertically, and for scaling images so they get bigger or smaller. Here are contracts and purpose statements for those functions:
After a few of these, try mixing it up! Show students the Racket code or Circle of Evaluation for some of the new functions first, and have them guess the contract based on how they is used.
Making Flags
Overview
Students apply their knowledge of Contracts, Syntax and function composition to build flags using built-in image functions.
Learning Objectives
Learn how to use advanced image operations
Practice function composition
Practice using contracts to help with composing operations
Practice writing and evaluating nested expressions
Product Outcomes
Students create images for various nations’ flags
Materials
Editing environment (WeScheme or DrRacket with the bootstrap-teachpack installed)
Preparation
Computer for each student (or pair), running WeScheme or DrRacket (If using DrRacket, make sure the Images.rkt file is loaded)
Student Workbooks, and something to write with
Making Flags(Time 30 minutes)
Making Flags
Open this file and read through the code: [DrRacket | WeScheme] The code is also shown here:
There are three values being defined here. What are they?
Click "Run" and evaluate each of those values in the Interactions window.
Change the size of the dot and click "Run". Do you expect japan to look different than it did before? Why or why not?
To make the flag of Japan, we want to put a solid, red circle right in the middle of our flag. According to the definition for blank, a flag is 300 wide by 200 high. To put the dot at the center, we use the coordinates (150, 100).
The function that lets us put one image on top of another is called put-image:
How many things are in the Domain of this function?
What is the Range of this function?
In the definition for japan, what image is being used as the first argument? What is being used as the second?
This is a good time to remind students about indenting. Notice that all of the inputs to put-image line up with one another!
You’ve seen arithmetic functions nested before, such as (+ 4 (+ 99 12))
(+ 4(+ 9912))
(also shown as a Circle of Evaluation on the right). The second input to + is a number-producing subexpression, in this case (+ 99 12). put-image can be nested the same way.
This Circle of Evaluation will draw a star on top of another image, which itself is a circle drawn inside a square.
Convert this Circle of Evaluation into code, and try typing it into the computer. What image do you get back? Can you modify the code so that another image is added on top?
Have students practice this once or twice, and point out the natural indenting pattern.
By combining simple shapes together, you can make very sophisticated images!
Look at this picture of the Somalian flag.
What shapes will you need to make this flag?
Which colors will you need?
Define a new value called somalia, which evaluates to this image.
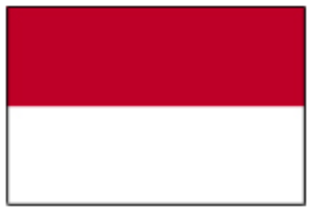
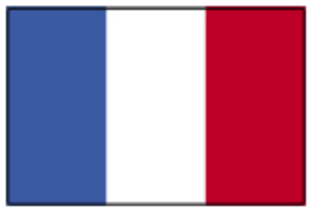
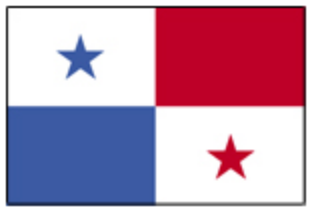
Try to define as many of the following flags as possible:
Indonesia
Nigeria
France
Switzerland
United Arab Emirates
Chile
Panama
Try making the flag for your favorite country, or even make up a flag of your own!
red-shape
Overview
Students define a piecewise function
Learning Objectives
Students learn the concept of piecewise functions
Students learn about conditionals (how to write piecewise functions in code)
Evidence Statementes
Students will understand that functions can perform different computations based on characteristics of their inputs
Students will begin to see how Examples indicate the need for piecewise functions
Students will understand that cond statements capture pairs of questions and answers when coding a piecewise function
Product Outcomes
Students complete red-shape, which produces different shapes based on the input string
Pens/pencils for the students, fresh whiteboard markers for teachers
Class posters (List of rules, basic skills, course calendar)
Language Table (see below)
Preparation
red-shape(Time 10 min)
red-shapeConditionals allow functions to have very different behavior, based on their input. A function that produces red circles of various sizes doesn’t need conditionals (since the code will always draw a circle), but a function that produces different shapes entirely would need to evaluate the appropriate expression for a given shape.
You may want to show students the code for simpler functions (red-circle, green-triangle, etc), pointing out that those functions evaluate the same expression no matter what - they merely fill in the variable with a given value.
Turn to Page 34, and use the Design Recipe to complete the word problem for red-shape.
Pause and debrief after each section, if necessary.
Conditions can be used in many places inside a videogame:
Have the player drawn differently when they get a power boost
Open doors when the player is holding a key
Move differently depending on keyboard input
2D Movement using Structs
Overview
Students are introducted to the @code{Posn} struct, and use it to add 2-dimensional movement to their game
Pens/pencils for the students, fresh whiteboard markers for teachers
Class posters (List of rules, basic skills, course calendar)
Language Table (see below)
Preparation
2D Movement using Structs(Time 20 min)
2D Movement using StructsRight now, each character in your game moves along only one axis. update-danger takes in the danger’s x-coordinate and produces the next one, but it has no ability to read or update the y-coordinate. As a result, your danger can only move left or right.
Suppose we wanted to move diagonally. What would have to change about the Domain? The Range? The Purpose Statement?
Use a diagram on the board to demonstrate that update-danger will need to take in both the x- and the y-coordinate, and that it will have to produce both as well.
While you’ve seen a function take in multiple values, you have never seen a function produce more than one thing at a time.
All functions must produce one value.
However, Racket actually allows us to create new kinds of data that can contain more than one thing. These are called data structures, or "structs" for short. One kind of struct that is useful to us is called a position, which Racket abbreviates posn.
Open a new program.
Enter a Number value in the Interactions window and hit Enter. What did you get back?
Enter a String value in the Interactions window and hit Enter. What did you get back?
Enter a Boolean value in the Interactions window and hit Enter. What did you get back?
As you can see, all values evaluate to themselves. To create a posn, enter the following code in the Interactions window:
What do you get back when you hit Enter? Which number is the x-coordinate? The y-coordinate?
Have students make Posns for other coordinates, like the corners of the screen or the center.
Thinking back to an update-danger that moves diagonally, we now know that the Range must be a posn.
Start with a blank Design Recipe, and rewrite update-danger to produce a Posn instead of a Number. Instead of producing (- x 50), your function will have to produce a Posn in which the x and y have changed in some way. Here’s one example, which moves the danger left by 50 pixels and down by 10:
Write a second example.
Circle and label what changes.
Define the function on your worksheet, then modify the definition in your program so that your danger moves diagonally!
Modify update-target so that it moves diagonally as well.
update-player will also need to be changed, so that it takes in the x- and y-coordinate and the key that was pressed. The Range, predictably, will be a Posn.
Change your EXAMPLEs for "up" and "down" so that they take in both coordinates and produce Posns.
Add two more EXAMPLEs, this time for "left" and "right".
Modify each clause of your cond statement, so that each one produces a Posn. Don’t forget to change your else clause, too!
Pens/pencils for the students, fresh whiteboard markers for teachers
Class posters (List of rules, basic skills, course calendar)
Language Table (see below)
Preparation
Going further(Time : flexible)
Going furtherNow that you’ve finished your game, here are some other things you can add to make it more exciting:
Some people prefer to use the "WASD" keys for movement, instead of the arrow keys.
Add these to update-player, so that either set will work.
After you have implemented Posns, add keys for diagonal movement.
Use and inside update-player, so that the player will only move up if its y-coordinate is less than 480.
Do the same for downward motion.
Add a "Safe Zone": put a green box or green shading somewhere on the background, then change collide?
so that a player only collides if the player touches a danger AND they are not inside the zone.
If you’ve already added 2-dimensional movement using Posns, try making the y-coordinate of your danger change
as a function of x. You can move in a wave pattern by using sin and cos!
The last item on this list has connections to trigonometry: if the y-coordinate is detemined by , for example,
the character will bob up and down, following the sine wave. Students can practice drawing "flight paths" using a graphing
calculator, then enter those functions into their game!
 Supplemental Lessons
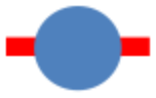 Imagine that we wanted to make an image of a simple satellite that looks like the one shown here. This image contains a blue circle and a red rectangle, with the circle on top of the rectangle. Racket has a function called overlay, which lets you put one image on top of another. Here is its contract, and a purpose statement that explains what it does:
 This satellite is flying level in the sky. What if a strong wind were blowing, causing the satellite to fly slightly on its side, like the image seen here? Then, we would want the Racket rotate function:
Try copying and pasting this code into the editor, and see what shape you get. What happens if you change the number 30?
This satellite is flying level in the sky. What if a strong wind were blowing, causing the satellite to fly slightly on its side, like the image seen here? Then, we would want the Racket rotate function:
Try copying and pasting this code into the editor, and see what shape you get. What happens if you change the number 30?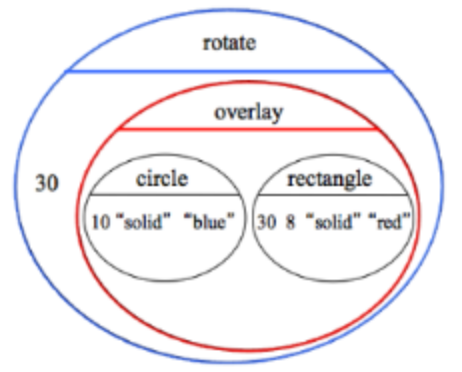 Let’s look at this code, viewed as a Circle of Evaluation. Our rotate function is shown here, in the blue circle. 30 is the number of degrees we’ll be rotating, and the second input is the Image we want to rotate. That image is the result of overlaying the circle and the rectangle, shown here in red. By looking at this Circle of Evaluation, can you guess the contract for the rotate function?
 Look at this picture of the Somalian flag.